Neo Pixel is a chainable, addressable strips of leds hardware controllable using only one signal wire. The NeoPixel service will allow you to connect and control the Neo Pixel strip connected to an Arduino with MyRobotLab (MRL).
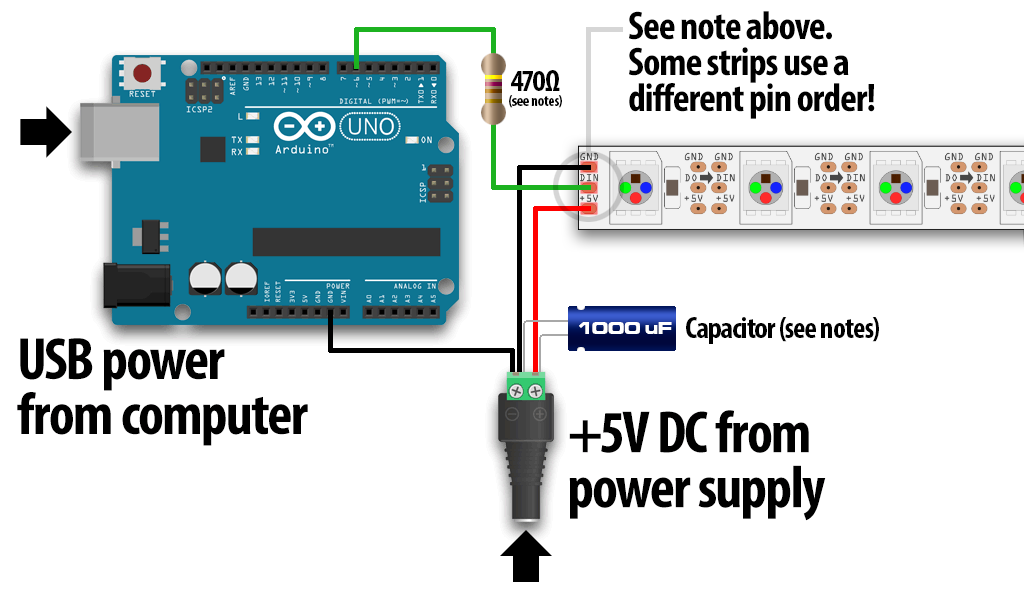
The NeoPixel hardware can connect to any pins on the arduino board, including analog pins
Note: Neo Pixel hardware can draw a lot of power (60mA for each pixels at full brightness). If you are running a large set of LEDs, you should power it with external power source instead of the Arduino.
Hardware:
References:
Great input Calamity !! I'm
Great input Calamity !!
I'm going to set that in my next script !
Tested with a deported nano
Tested with a deported nano and 90% worky :) Great work
( I use a nano and the script launch fine but only once. It stuck the deported arduino and need to be hand reset )
There no errors in the log after the last line : NEO_PIXEL_SET_ANIMATION
Setup :
I solder wires on RX/TX 3 onto the nervoboard ( don't use RX/TX0 !! it is usb ) to connect nano RX/TX
This is the script I use from your work :
[MRL 1803]
from time import sleep
arduino = Runtime.createAndStart("arduino","Arduino")
arduino.setBoardMega()
arduino.connect("COM4")
arduino1 = Runtime.createAndStart("arduino1","Arduino")
arduino1.setBoardNano()
arduino1.connect(arduino,"Serial3")
sleep(1)
neopixel = Runtime.createAndStart("neopixel","NeoPixel")
neopixel.attach(arduino1, 3, 16)
neopixel.setAnimation("Theater Chase", 255, 0, 0, 1) #running Theater Chase with color red at full speed
sleep(5)
neopixel.animationStop()
Thanks Anthony for sharing
Thanks Anthony for sharing your test script.
I think the bug with the Nano has to do with the RX/TX at the Nano side...
These are still connected to the FTDI chip onboard !
I will use a Arduino Pro Mini board, this one is without a onboard FTDI chip.
Here a view to the updated NervoBoard:
Regards,
Marten
Nano
So the script above gets loaded onto the Nano?
which gets plugged into the USB Hub?
Thanks!
Stephen
Hi Stephen, The srcipt is
Hi Stephen,
The srcipt is Phyton based, which can run via MRL !
The Nano just need the MRLComm.ino sketch to communicate with MRL.
The script from Calamity needs a USB connection to the Nano...
And the script from Moz4r is connected via "RX / TX 3" from the Arduino Mega !
So the Mega and the Nano are connected with the same USB.
USB -> Arduino_Mega -> RX / TX 3 -> Nano
Regards,
Marten
Nano hookup
Hi Martin,
It makes sense that the Nano would hold the *.ino script so it would become another device that MRL could manage. I am unsure about the USB -> Arduino_Mega -> RX / TX 3 -> Nano
My plan was to use Calamity's script (I didn't know there were two, and don't know which one I have...)
I think I would load *.ino onto the Nano, then plug it in via usb to the InMoov's USB Hub -- I have the tablet, the Mega's, the Camera's, and (for now) a mouse on the hub. MRL should see the Nano (probably) on COM5 since the Mega's are showing up on 3 and 4
Does this sound right?
Thanks,
Stephen
Hi Stephen, Yes all sounds
Hi Stephen,
Yes all sounds right if you like to use the Calamity *.py :)
Double check your com port number during the *.ino upload.
(You will need to select the correct com port anyway before you can upload.)
Regards,
Marten
NeoPixel Service
I have v1723 with these lines
documentation check
@hairygael @MdG_NL @Calamity
Hi Guys I don't have last nervoboard so I can't validate rx/tx pins place, can you check if I don't make mistakes please ?
https://github.com/MyRobotLab/inmoov/wiki/HOWTO-Neopixel-diagram-&-conf…
Looks very good and cool
@moz4r
Looks very good and cool Anthony, great work !
And the RX / TX pins are correct named in your HowTo.
Regards,
Marten
thank you Marten !
thank you Marten !
neo.yml
This is an example of a NeoPixel named "neo" with base color RGB (212, 0, 255), pin 5, with 8 pixels attached to an Arduino controller named "mega" - it will startup, set the color and automatically run the Larson Scanner with that color.