
![]()
Step by Step Install
-
Install latest Raspbian “wheezy” from here http://www.raspberrypi.org/downloads. After imaging - you should boot at least once with a monitor, an auto-config script will run and you will be ablet to expand the file system. This is important as the default size is to small to have much fun. After all the Raspbian installs installs and updates plus Java, MRL and all its services I am at 74% on a 2 Gig drive.
MRL runs on all sorts of hardware platforms, Raspberry Pi is identified as armv6.hfp.32.linux
The following is an install only using ssh or putty from a remote system. And the raspi is only connected to an ethernet cable. After imaging my raspi I did not know what IP address it obtained. So I used a IP Scanning utility to find it on my local subnet. But all this could be done through a terminal on the RasPi desktop too.
-
Update your system
sudo apt-get -y update
sudo apt-get -y upgrade
-
Installl openjdk 7 and other dependencies with the following command line
sudo apt-get -y install openjdk-7-jdk libunicap2 libjpeg8-dev libv4l-dev libjpeg62-dev libv4l-dev libavcodec-dev libavcodec libjpeg62-dev libv4l-dev libdc1394-22-dev libavformat53 libswscale2
-
Download latest complete package, unzip and install MRL you can find the latest release here - https://code.google.com/p/myrobotlab/downloads/list
wget https://myrobotlab.googlecode.com/files/myrobotlab.1978.20140218.1942.z…
unzip myrobotlab.1978.20140218.1942.zip
cd myrobotlab.1978.20140218.1942
chmod +x *.sh
./webgui.sh
-
Point browser @ http://<raspberry ip address>:7777
.png)
If you can see a web page ... YaY ! You did it ! The Bare Bones MyRobotlab comes with a GUIService, WebGUI, Python, and a few other services, however, I usually like to install everything. This can be done with a single REST URL command
http://<raspberry ip address>:7777/services/runtime/updateAll
The screen should start scrolling as MRL is busy installing all the services and eventually updating the myrobotlab.jar

This will take a while but when its completed all services should be installed an you will have the latest code.
ONE PROBLEM - which I will fix soon is at the end of the update MyRobotLab will needs to be restarted. It does this automatically, but when it restarts it starts the inappropriate myrobotlab.sh instead of the webgui.sh which we have been using.
So kill it with
killalll java
and restart the webgui.sh
./webgui.sh
You should be able to get back to the REST API.

Start OpenCV and Stream the Video to a Web Page
-
Make sure your camera is plugged into the RasPi and you can see it with this command
ls /dev/video*if you have 1 camera typically /dev/video0 will return
-
Start an OpenCV Service - this can be done with the following URL
http://<raspberry ip address>:7777/services/runtime/createAndStart/opencv/OpenCVLets look at the URL. The first part is just a host and port name. The /services means you are interested in the currently running services. /runtime means you are interested in a service named "runtime" which happens to be the Runtime service. /createAndStart is a two parameter Runtime method which is used often to create and start services in mrl. The two parameters are the unique "name" of the service, and the type of service. The unique name we are going to call this service is opencv, its type is OpenCV.
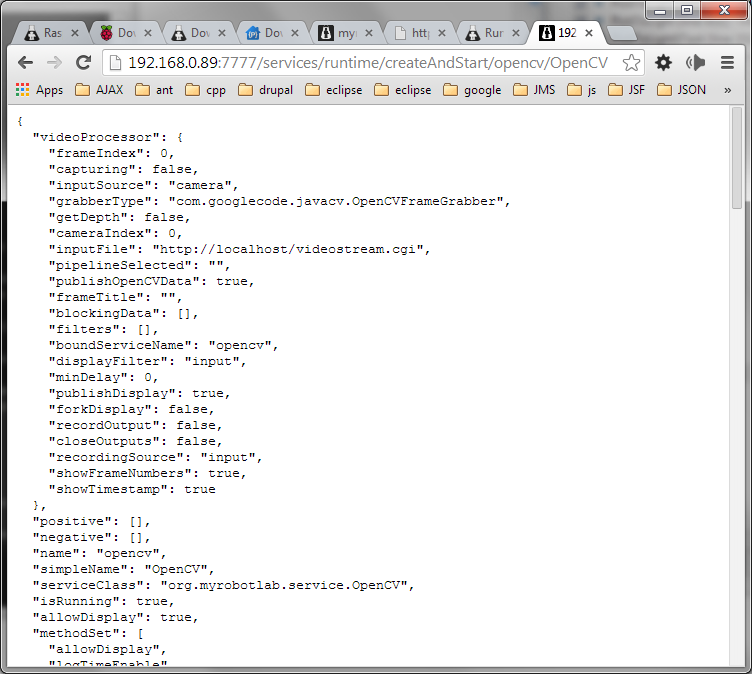
It takes a while to process, but eventually a new OpenCV instace is created and the result of that service is passed back to the brower encoded into a JSON object. The content is not really important at the moment, but it represents all the data in an OpenCV service. JSON is an effecient and readable form of data which is often used to serialize information over the network.
-
If you go back to
http://<raspberry ip address>:7777/services
you should be able to see the newly created opencv service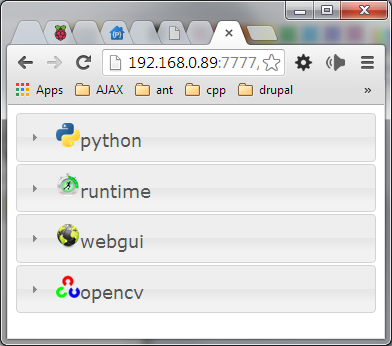
-
To stream the video data over the web we need the VideoStreamer service. Create one with the following URL
http://<raspberry ip address>:7777/services/runtime/createAndStart/streamer/VideoStreamerNext we need to attach the VideoStreamer to the OpenCV service. Do this with the following URL
http://<raspberry ip address>:7777/services/streamer/attach/opencv
Start the opencv capturing
http://<raspberry ip address>:7777/services/opencv/captureAnd if everything went correctly
You'll be able to see a video stream
http://<raspberry ip address>:9090 Here's looking at you. The stream will be high latency and low fps - but its a start. Play around with the OpenCV's methods - addFilter - you can "PyramidDown" and change to "Gray" -- Canny also makes the stream faster.. 640x480 color is pretty heavy to be send through OpenCV and a mjpeg streamer. You can try the ever-popular face finder filter too.
Additional RasPi Dependencies For MyRobotLab Services
Arduino Service
need this if your going to use an Arduino
sudo apt-get -y install gcc-avr avr-libc
OpenCV Service
Performance
References
- http://mitchtech.net/raspberry-pi-opencv/
- http://salaboy.com/2013/06/14/using-javacv-in-the-raspberry-pi-linux-arm/
mjpeg_streamer
svn checkout svn://svn.code.sf.net/p/mjpg-streamer/code/ mjpg-streamer-code
<<todo - compile and install>>
References
usb drive
mkdir /media/usbdrive
sudo mount -t vfat -o uid=pi,gid=pi /dev/sda1 /media/usbdrive
JoyStick
sudo apt-get install libjinput-jni libjinput-java
MRL does not require OpenCV to be built on a raspi - it comes with its own version in the repo.
mkdir build
mkdir build/opencv
cd build/opencv
wget http://downloads.sourceforge.net/project/opencvlibrary/opencv-unix/2.4…
tar xvzf opencv-2.4.6.1.tar.gz
cd opencv-2.4.6.1/
mkdir relase
cd relase
make
sudo make install
sudo ldconfig
This was lifted from the excellent write up here - http://www.stuffaboutcode.com/2012/06/raspberry-pi-run-program-at-start-up.html
sudo myrobotlab.1660.20130826.0701 mrl
sudo mv mrl /opt/
# copy a script you want to use as your daemon boot script
sudo cp webgui.sh boot.sh
sudo vi /etc/init.d/mrl.sh
#! /bin/sh
# /etc/init.d/mrl.sh
### BEGIN INIT INFO# Provides: mrl# Required-Start: $remote_fs $syslog# Required-Stop: $remote_fs $syslog# Default-Start: 2 3 4 5# Default-Stop: 0 1 6# Short-Description: Simple script to start a program at boot# Description: The MRL start stop script - originally from www.stuffaboutcode.com### END INIT INFO# If you want a command to always run, put it here# Carry out specific functions when asked to by the systemcase "$1" instart)echo "Starting mrl"# the optional "big hammer" which kills all zombies# if you have other java processes don't use thiskillall java# run application you want to start# its important to cd to the proper directory and start it therecd /opt/mrl# this can be any script which starts mrl./boot.sh &;;stop)echo "Stopping mrl"# kill application you want to stopkillall java;;*)echo "Usage: /etc/init.d/mrl {start|stop}"exit 1;;esacexit 0
# make sure there are no problems and mrl is forked off like a good service


This is very useful to quickly look at what is on the bus.
sudo i2cdetect -y 0 #(if you are using a version 1 Raspberry Pi)sudo i2cdetect -y 1 #(if you are using a version 2 Raspberry Pi)
i2c-bcm2708i2c-dev
sudo apt-get install python-smbussudo apt-get install i2c-tools
blacklist spi-bcm2708blacklist i2c-bcm2708
sudo i2cdetect -y 1
References :
- More Possible Video Optimizations
- Real Time & Use Cases on RasPi
- MJPEG on RasPi
- http://elinux.org/RPi_Distributions Big list of Operating Systems which will run on Raspberry Pi - and details of each
- The Mother Lode of RasPi Tutorials
- http://www.raspberrypi-spy.co.uk/2013/07/how-to-use-a-mcp23017-i2c-port-expander-with-the-raspberry-pi-part-1/
- ran into an issue of a bad mirror - this might fix it - http://www.raspberrypi.org/phpBB3/viewtopic.php?t=17307&p=173097
- http://eclipsesource.com/blogs/2012/10/17/serial-communication-in-java-with-raspberry-pi-and-rxtx/
- http://www.raspberrypi.org/downloads
- http://blog.synyx.de/2013/03/running-rxtx-on-your-raspberry-pi/
- http://elinux.org/RPi_Java
- http://raspberrypi.stackexchange.com/questions/4683/how-to-install-java-jdk-on-raspberry-pi
- http://www.makeuseof.com/tag/7-operating-systems-you-can-run-with-raspberry-pi/
- http://javafx.steveonjava.com/javafx-on-raspberry-pi-3-easy-steps/
- http://www.raspberrypi.org/phpBB3/viewtopic.php?t=34249&p=291720 - raspi mjpeg_streamer
- mjpeg reference
- gst_launch gstreamer reference
- another gstreamer reference for raspi
- http://salaboy.com/2013/06/14/using-javacv-in-the-raspberry-pi-linux-arm/
Worky :)
Worky :)
Although there are some issues - the red light should be green, and on Arduino the drop down never populates for ports - so the only way to connect is through Python - but there is DATA !! - Yay !
Red light
When I've been doing my testing for the Xbee stuff I too have the red light in the serial console. I've probably seen it in both Firefox and Safari on my MacBook but I can test both if you need a definitive list.
i see this error when run a
i see this error when run a script on pi and PC