
That's "House-ton." The way they say it in New York City.
If you're interested in robots enough to build one, then at least at some point you were probably inspired by the likes of Robbie the Robot from Forbidden Planet. Or Robot B9 from Lost in Space. Or Johnny Five from Short Circuit. Or any of a number of robots from countless movies and TV shows that traveled with, assisted and interacted with their human friends and associates.
I don't know about you, but I've always wanted a robot that could move around my home, talk to me about what's going on, and even small talk about inconsequential things. Maybe do some simple tasks around the house--but that is definitely NOT the goal here. After all, when you come down to it, how much did Robot B9 ACTUALLY do for Will Robinson?
Houston will be a full sized "companion robot" standing about 4 feet tall, containing an Atom 525 based single board computer, and an Arduino Mega 2560 used as an interface and controller for the motors and servos that make up the complete system.
An Xtion Pro Live will be the primary sensor. There will also be odometry from the motorized drive, and position sensing of the 4 DOF arms.
This is a hobby level robot, definitely a learning experience for me and in spite of the lofty goals, as low budget as I could possibly make it. So far, a fairly complete list of parts comes in at under $800. I've been collecting parts for months, and I'm finally to the point where things can start happening.
Here's an early concept sketchup screen capture Already outdated, but not far from what's actually been built so far.
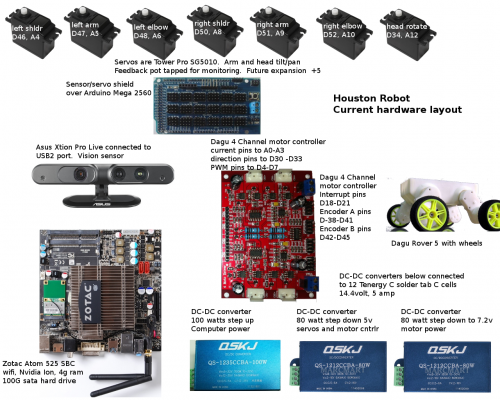
This is a layout of Houstons electronics, motors and servos
Houston will need an Arduino service augmented with Mega capability !
Arduino Mega 2560 PIN mapping table
| Pin Number | Pin Name | Mapped Pin Name |
|---|---|---|
| 1 | PG5 ( OC0B ) | Digital pin 4 (PWM) |
| 2 | PE0 ( RXD0/PCINT8 ) | Digital pin 0 (PWM) (RX0) |
| 3 | PE1 ( TXD0 ) | Digital pin 1 (PWM) (TX0) |
| 4 | PE2 ( XCK0/AIN0 ) | |
| 5 | PE3 ( OC3A/AIN1 ) | Digital pin 5 (PWM) |
| 6 | PE4 ( OC3B/INT4 ) | Digital pin 2 (PWM) |
| 7 | PE5 ( OC3C/INT5 ) | Digital pin 3 (PWM) |
| 8 | PE6 ( T3/INT6 ) | |
| 9 | PE7 ( CLKO/ICP3/INT7 ) | |
| 10 | VCC | VCC |
| 11 | GND | GND |
| 12 | PH0 ( RXD2 ) | Digital pin 17 (PWM) |
| 13 | PH1 ( TXD2 ) | Digital pin 16 (PWM) |
| 14 | PH2 ( XCK2 ) | (TX3) |
| 15 | PH3 ( OC4A ) | Digital pin 6 (PWM)(RX3 ) |
| 16 | PH4 ( OC4B ) | Digital pin 7 (PWM)(TX2) |
| 17 | PH5 ( OC4C ) | Digital pin 8 (PWM)(RX2 ) |
| 18 | PH6 ( OC2B ) | Digital pin 9 (PWM)(TX1) |
| 19 | PB0 ( SS/PCINT0 ) | Digital pin 53 (PWM)(RX1) |
| 20 | PB1 ( SCK/PCINT1 ) | Digital pin 52 (PWM)(SDA) |
| 21 | PB2 ( MOSI/PCINT2 ) | Digital pin 51 (PWM)(SCL) |
| 22 | PB3 ( MISO/PCINT3 ) | Digital pin 50 |
| 23 | PB4 ( OC2A/PCINT4 ) | Digital pin 10 (PWM) |
| 24 | PB5 ( OC1A/PCINT5 ) | Digital pin 11 (PWM) |
| 25 | PB6 ( OC1B/PCINT6 ) | Digital pin 12 (PWM) |
| 26 | PB7 ( OC0A/OC1C/PCINT7 ) | Digital pin 13 (PWM) |
| 27 | PH7 ( T4 ) | |
| 28 | PG3 ( TOSC2 ) | |
| 29 | PG4 ( TOSC1 ) | |
| 30 | RESET | RESET |
| 31 | VCC | VCC |
| 32 | GND | GND |
| 33 | XTAL2 | XTAL2 |
| 34 | XTAL1 | XTAL1 |
| 35 | PL0 ( ICP4 ) | Digital pin 49 |
| 36 | PL1 ( ICP5 ) | Digital pin 48 |
| 37 | PL2 ( T5 ) | Digital pin 47 |
| 38 | PL3 ( OC5A ) | Digital pin 46 (PWM) |
| 39 | PL4 ( OC5B ) | Digital pin 45 (PWM) |
| 40 | PL5 ( OC5C ) | Digital pin 44 (PWM) |
| 41 | PL6 | Digital pin 43 |
| 42 | PL7 | Digital pin 42 |
| 43 | PD0 ( SCL/INT0 ) | Digital pin 21 (SCL) |
| 44 | PD1 ( SDA/INT1 ) | Digital pin 20 (SDA) |
| 45 | PD2 ( RXDI/INT2 ) | Digital pin 19 |
| 46 | PD3 ( TXD1/INT3 ) | Digital pin 18 |
| 47 | PD4 ( ICP1 ) | |
| 48 | PD5 ( XCK1 ) | |
| 49 | PD6 ( T1 ) | |
| 50 | PD7 ( T0 ) | Digital pin 38 |
| 51 | PG0 ( WR ) | Digital pin 41 |
| 52 | PG1 ( RD ) | Digital pin 40 |
| 53 | PC0 ( A8 ) | Digital pin 37 |
| 54 | PC1 ( A9 ) | Digital pin 36 |
| 55 | PC2 ( A10 ) | Digital pin 35 |
| 56 | PC3 ( A11 ) | Digital pin 34 |
| 57 | PC4 ( A12 ) | Digital pin 33 |
| 58 | PC5 ( A13 ) | Digital pin 32 |
| 59 | PC6 ( A14 ) | Digital pin 31 |
| 60 | PC7 ( A15 ) | Digital pin 30 |
| 61 | VCC | VCC |
| 62 | GND | GND |
| 63 | PJ0 ( RXD3/PCINT9 ) | Digital pin 15 |
| 64 | PJ1 ( TXD3/PCINT10 ) | Digital pin 14 |
| 65 | PJ2 ( XCK3/PCINT11 ) | |
| 66 | PJ3 ( PCINT12 ) | |
| 67 | PJ4 ( PCINT13 ) | |
| 68 | PJ5 ( PCINT14 ) | |
| 69 | PJ6 ( PCINT 15 ) | |
| 70 | PG2 ( ALE ) | Digital pin 39 |
| 71 | PA7 ( AD7 ) | Digital pin 29 |
| 72 | PA6 ( AD6 ) | Digital pin 28 |
| 73 | PA5 ( AD5 ) | Digital pin 27 |
| 74 | PA4 ( AD4 ) | Digital pin 26 |
| 75 | PA3 ( AD3 ) | Digital pin 25 |
| 76 | PA2 ( AD2 ) | Digital pin 24 |
| 77 | PA1 ( AD1 ) | Digital pin 23 |
| 78 | PA0 ( AD0 ) | Digital pin 22 |
| 79 | PJ7 | |
| 80 | VCC | VCC |
| 81 | GND | GND |
| 82 | PK7 ( ADC15/PCINT23 ) | Analog pin 15 |
| 83 | PK6 ( ADC14/PCINT22 ) | Analog pin 14 |
| 84 | PK5 ( ADC13/PCINT21 ) | Analog pin 13 |
| 85 | PK4 ( ADC12/PCINT20 ) | Analog pin 12 |
| 86 | PK3 ( ADC11/PCINT19 ) | Analog pin 11 |
| 87 | PK2 ( ADC10/PCINT18 ) | Analog pin 10 |
| 88 | PK1 ( ADC9/PCINT17 ) | Analog pin 9 |
| 89 | PK0 ( ADC8/PCINT16 ) | Analog pin 8 |
| 90 | PF7 ( ADC7/PCINT15 ) | Analog pin 7 |
| 91 | PF6 ( ADC6/PCINT14 ) | Analog pin 6 |
| 92 | PF5 ( ADC5/TMS ) | Analog pin 5 |
| 93 | PF4 ( ADC4/TMK ) | Analog pin 4 |
| 94 | PF3 ( ADC3 ) | Analog pin 3 |
| 95 | PF2 ( ADC2 ) | Analog pin 2 |
| 96 | PF1 ( ADC1 ) | Analog pin 1 |
| 97 | PF0 ( ADC0 ) | Analog pin 0 |
| 98 | AREF | Analog Reference |
| 99 | GND | GND |
| 100 | AVCC | VCC |
Hello DancesWithRobots and Welcome !
"After all, when you come down to it, how much did Robot B9 ACTUALLY do for Will Robinson?"
Didn't he have an increadibly innate sense of danger? If only Sparkfun sold the danger sensor :).
This looks like a great project and I think it will be very inspiring for other roboteurs, I really like your sketup design. Nice form. I was always intimidated creating arms out of Servos. Kind of like T-Rex arms, but they look great. I think they could be really expressive too. For example, you could give them the imposing gun slinger pose, or the "shrug", lots of potential.
I have not released MRL 15 because there still some work that needs to be done with the dependency management sub-system. MRL now uses Apache Ivy to manage build time & run time dependencies.
Open source projects are amazing. Sphinx 4, OpenCV, Freetts, Player Stage, JGaph, the list goes on and on. But one of the challenges of OpenSource is all of these projects have their own release cycles and the dependency management of multiple projects becomes very complexe quickly. Typically wrong, or missing dependencies is one of the biggest stopping blocks open source users encounter.
Now MRL uses Ivy similar to yum or apt-get. All the sub-system dependencies are organized and stabalized in a repo here http://myrobotlab.googlecode.com/svn/trunk/myrobotlab/thirdParty/repo/ . Additionally, this system can be used to get only the modules desired, which makes a lean and clean system.
So that is how its suppose to work in "theory"... of course the implementation is not quite done and it will take some work to finish.
You mentioned that you still were waiting on some hardware components. It has been my personal experience at this point most robots have a very short uptime life. This can be due to batteries running out, hardware failing, or certain hardware not existing. Also it can be more challenging to develop on robotic hardware, due to lack of screen, keyboard or other necessary human interface devices missing from the system.
MRL can be loaded on your personal computer, and developed there in Python or Java and then at some point moved to your robotic hardware. I would suggest starting this way so at least you become familiar with the software to a degree, since your hardware setup is not finished. You certainly can develop on the SBC if that is your preference, you will have to guide in that regard.
For example, it would be helpful to me to know what exactly is hooked up currently and powered. Do you have the SBC on a plugged in power supply? Is the Arduino Mega currently plugged in.
To Start:
On the system I was using at the time it looks like this :
Press the exec button once.
When I ran it I found that the utterance triggered an incorrect recognition (feedback loop). An isPeaking event is supposed to fire and prevent recognition of its own utterance. This is on windows box (haven't tried it on Linux) but suspect the result will be the same. Probably the biggest factor is the fact of using a microphone so close to the speakers. I'll look into it later.
Hopefully, this is enough to get you started.
You know what they say about the pioneers
Pioneers are the guys with arrows in their backs.
OK, so in order to get update.sh to run (Both my desktop system and Houseton's SBC run Ubuntu 11.10. For now, this was done on my desktop computer.) I had to go into the permissions tab of the file properties and check the "allow file to run as a program" box. While I was in there I did the same thing to myrobotlab.sh and jython.sh.
Once that was done, in terminal I cd' to the folder where I unpacked it, and typed in "sh update.sh" and got a lot of text flashing by--and a lot of "missing dependencies' error and a missing cfg file.
Doing the same thing to myrobotlab.sh got pretty much the same results.
I was lazy about unpacking. For now it's still in my downloads folder, in a folder called "RobotLab" (Sorry to take liberties with the name of your project. I'll give it it's proper name once it runs and I move it to it's final home.)
Here's a log file.
If there's anything else you want to know about or see--let me know.
As for Housetons currenty state of assembly:
(I'll include pictures later. It's early morning and I decided to check email after letting some cats out. Big mistake!)
Currently, Houston is a Rover 5 with an aluminum plate bolted, (actually screwed) to it. On top of that is an Arduino Mega 2560 and sensor shield, a laptop sized hard drive, (100 gig, if I recall.) A Dagu 4 channel controller, Three DC-DC converters to supply 5 volts to the servos, 7.2 volts to the drive motors, and 18 volts to a Zotac mini itx SBC with an Atom 525 processor, 4 gig of ram and onboard wifi running Ubuntu 11.04.
I'll go into the construction of the base in another post.
The Arduino is intended to be a controller between the SBC and almost everything else. Right now, the servos are disconnected, as is the wiring between the Arduino and the motor controller. The reason for that is I've been saving, buying parts, waiting for parts--and I keep realizing I need something else--which starts another round of changes. . .But I (finally) have a good idea of what is going where, so that should be completed. . .probably today's project.
There are some aluminum uprights that rise to roughly 90cm above the the "deckplate" that support the two arms. The arms have changed somewhat from the picture--No more "T Rex" arms. Originally, I started out with Lynxmotion parts, but I wasn't happy with the results--Too short. (And expensive.)--So I hand cut some stiff plastic I had, and assembled two arms, roughly 45cm long.
Currently, they have only three degrees of freedom. Shoulder rotation forward to roughly 180 degrees, shoulder rotation to the side to about the same point, and an elbow that comes in to about 160 degrees or so. There is also provision for wrist rotation.
I'd like to get the wrists to bend, but, It's kind of important that I stay under 12 servos. Two for head rotate and tilt, the six I've described for the arms along with two more for wrist rotation and--well it depends. I haven't quite finalized the end effectors yet. I could probably fabricate a pair of some sort of three fingered hand or robot claw and use another pair of servos to operate them, or. . .well I'm leaning towards one of those coffee grounds/balloon/vacuum grippers that were all over the robot blogs a few months ago. That would give me back a pair of servos for wrist bending, and what I consider appropriate dexterity. What ever I do, the arms have to stay under 5 servos each.
The servos I have have all had their feedback potentiometers tapped and their cables extended so I could get some position data into the Arduino.
I DO have weight issues with the arms. The servos aren't strong enough to lift them to their full extension, so I'm currently "studying balanced swing arm lamps." There may be a future redesign of the arms, or more likely, I'll just use springs to offset the weight.
Construction of the arms, along with pictures and the rationale for why I did things the way I did will be the subject of a future post.
I have an Xtion Pro Live, (Asus' answer to the Kinect.)
on order and it should arrive in a couple of days.that arrived today. TodayI'll be orderingI ordered a dozen solder tab batteries that should arrive next week. That's the end of the major parts--tho no doubt there will be changes--So next week, Houseton should be able to actually move untethered under his own power for the first time ever.My software developement so far has been on my desktop system, and has been limited to Arduino scripts that tested the drive motors and servos. I figure, I'll install VNC to Houstons SBC so I can develop directly without having to connect a keyboard and monitor. Later I'll experiment with a myrobotlab connection between my computer and Houstons SBC.
The whole thing is going to be covered with a shell of cloroplast. (Currently sitting in a box in the corner.) And comes in at about 5 kilos. (Tested with the weight of a dozen alkaline C cells.) Not sure how Rover 5 is going to like that. so there may be a future revision with beefier drive motors. So far, everything has been nicely balanced, but I guess we'll see what happens next week when I add 2.5kg of batteries.
I'm sure you know that I became aware of myrobotlab at letsmakerobots.com. Over there I probably come across as a wannabee knowitall, because I answer a lot of questions in spite of having no posted projects. That's because I got this thing about making a lot of claims with little to show for it--especially on a site where it seems people are completing a new project every other week. But now I'm finally ready to put things together and make them work.
No 64 bit
The issue is I dont have any 64 bit machines. By the way, are you getting email notifications of new comments? Just wondering what all is working or not working.
I have added an amd64 configuration set to the repo, you should be able to proceed
OK, I just checked my email
OK, I just checked my email before coming here and I didn't get an email.
As for no 64 bit version, this has bitten me before, and may not be such a big deal. Houstons version of Ubuntu is 32 bit.
newest log
This is my latest log. Shorter. Maybe it's all about this missing config file?
Progress !
Its nice to hear that some parts are beginning to work. I've successfully run the OpenCV Service from my newly installed Ubuntu 11.10
It has been a while since I did much to the filters, but here I've added a Lucas Kanade Optical track point on my eye. This point will typically stabalize and track through the video stream. I noticed my laptop camera is very slow. The fastest camera I have worked with would be the Kinect.
The OpenCVFrameGrabber was designed to work with V4L(2) so it should be able to pick up /dev/video0 . That is what I have by default. If nothing happens, you might want to send me the log after your attempt to start a capture.
Start of Servo & Arduino tutorial
http://myrobotlab.org/content/basic-steps-arduino-and-servo-services
This might shed some light on what is "supposed" to happen. Unfortunately, I do not have hardware at the moment, so I can't do a video tutorial :P
Does this work for you - with some adjustment?
Not quite--But it's close.
Not quite--But it's close. And I'm not sure why it fails.
First, I changed the baud rate to 9600. (Diecimila's are slow.) Then I changed the serial port to /dev/ttyusb0. (Typical for a Diecimila or Uno on a Linux box.)
Then, since I only have the option to use 2 servos, (I'm plugging into an AFMotorShield, which only has two ports available for servos.) I commented out servo 3, and changed servo's 1 and 2 to pins 9 and 10. Finally I commented out servo 3 in the sweep portion of the code.
Nothing happened when I ran it. (Exec button.) SO I deleted everything after the imports and services. When I ran it, the services all started. SO, I reloaded the code, and deleted everything that came after the serial portion. Exec--services opened again.
Then I deleted only the last few lines--the sweep test. Once again, the services loaded.
When I opened up the code again, and ran it--no services. SO, I get the impression we have an issue with syntax or the for loop--which looks fine to my noo eyes.
Question for you--is it possible to get an indication of whatever errors might be popping up? I'm guessing that this involve opening a console to catch error messages. But the details. . .I'm. . .stumped.
I think I got it...
If you copy pasted the script as is - the for loop will lose it's indentation. Indentation is something Python is very terse about.
I copied it out and attempted to run it and got the error :
EXCELLENT! I'll make that
EXCELLENT! I'll make that change a little later today and let you know how it worked out.
Funny, I DID wonder about the indentation, and when I dropped the sweep portion into IDLE, it DID complain about indentation--and worked when I turned it into a simple print x loop, it worked. But I was too tired to make the next logical connection.
Still no cigar but. . .
It seems to run, going by the log, however, the servos never moved.
So, I commented out the sweep section, and just let it bring up the services. Then I went into the arduino service and was able to toggle pin 13.
So I went into the servo services and was able to move them--until I moved them too fast and they failed. Getting reconnected was a hassle, and I actually had to restart the whole computer.
I THINK, this might have something to do with the arduino timing--that is, it's getting too many commands from MRL to process when they're sent one degree at a time.
What if, the servo service was changed so that a position information is sent only once. Perhaps by adding a "send" or "move" button to the service. The angle could be set, and then an appropriately sized pulse could be sent to the servo by hitting the move button. Then, further commands are locked out until an appropriate amount of time, based on a servo speed value which could default to some number, but be selectable.
If I remember right, the timing value is the time it takes a servo to sweep to 60 degrees. I'll have to verify that.
In the future, a new service "puppet" or "pose" or whatever could oversee sending a string of commands to an array of servos--timed to avoid giving the Arduino a nervous breakdown.
Uh. . .maybe that's more of an application than a service. But I think before we can proceed with getting servos to work, we need to make them more reliable.
Also, I suspect that my slow Diecimila is not helping.
FYI - Chrome works for editing now...
Chrome browser now works with the WYSIWYG editor here...
Back at the lab (Yay) ... will be doing robust Servo testing (GUI & Jython).
Has the Arduino-Mega come off the boat yet ?
No. :( In fact, I'm not
No. :( In fact, I'm not even sure it shipped. (No tracking info) But. . .they're in stock at the local RS, so, I'm thinking about biting the bullet and picking one up tomorrow. Since it's the only thing I'm waiting for at this point.
update
Ok, finally really starting to work on the Arduino / Mega. At the moment I'm creating a AJAX/JSON interface for it, originally I was inspired by XicoMBD from MRL - (http://letsmakerobots.com/node/22139). He made a great interface for one in Processing.
This one will be potentially accessable from any browser anywhere... An optional (localhost only & authentication properties will be added)
But what a nifty concept, the idea that your arduino can be plugged in and accessable from anywhere in the world with no client software needed except a browser..
Here's the gui sofar..
This will be changeable from Duemilanove to Mega too..
Um...
I finally found & read the Dagu manual the motor controller... This is just another 2-bit (no pun intended) motor controller, and I just overhauled the Motor GUI. (I attached the manual)
I think we are good to try it... If it's hooked up.
I would recommend having it tethered and powered, with the wheels off the ground. So that if anything does go wrong it doesn't smash itself into the wall, or jump down a flight of stairs.
I'd be very interested in getting the encoder data in, but at the moment we can start with simple control.
Do you have a Mega attached to it?
If you load a Mega, then a Motor - You can attach the Motor to the Mega - choosing the PWM & direction pin. Then grab a joystick and you need just one line of code to control the speed and direction of the motor with the joystick.
What say you DWR.. are you ready ???
Ready. . .
I'm going to give this a try tomorrow and post the results.
Here is a start ... You'll
Here is a start ...
You'll need the latest bleeding edge.
The following is a script which I start an MRL instance - drop it and I will have joystick speed control over a motor attached to an Arduino (328 in my case).
You'll need to tweek it for your system. The Joystick name you'll need to record - add a joystick - connect - then stop recording - and look at the gui_<date>.py script generated in the .myrobotlab directory - it will have the full name (as it is in the gui) for the joystick device you want the motor connected to.
After I run this script I can move one of my joysticks on the gamepad up or down and the motor will change direction and speed accordingly
Make sure you load the Arduino with the latest MRLComm.ino - the new robust serial communication is "the bomb"
Other Erratta :
My motor is a 6V DC 293 rpm gear motor. It takes a whollop to move, almost 90% power - but once it finally starts moving you can slow it down to near 30% power before it stops. Auto-ramping (where if the motor knows its at rest and must overshoot in order to move accurately) might be a nice feature to add..
I took a peek underneath
I took a peek underneath Houston's skirt....
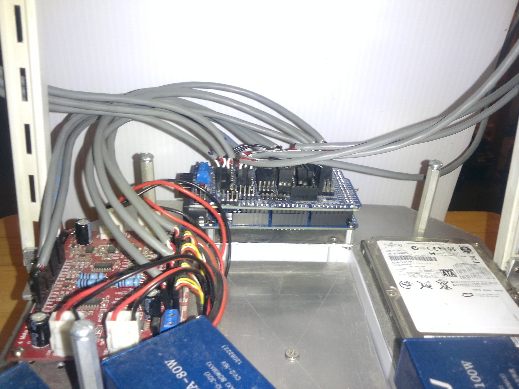
uh.. very neat & clean (as all robot privates should be) -
I was wondering how you built your cables - was it a sleeve that you ran wires through?
If so - where do you get it?
Houston's guts
The picture shows the Arduino wiring. The Arduino has a "sensor shield" which groups the pins in sets of four, and adds 5v and ground to each position, so it's very easy to plug in something like a servo or Ping sensor, or any other 3 pin device.
The wire I used is 20 gauge 3 conductor shielded with drain, covered with a pvc jacket. This means there is a mylar foil shield around the 3 conductors, and a bare wire along the length. I used the bare wire as a ground, wherever it was needed. In some cases, where there was no ground to worry about, I just pulled the drain wire out of the jacket.
I crimped my own pins on the wires, and cut them to length.
The motor controller pins were NOT layed out as signal, voltage gound, but rather a collection of control (such as direction) and monitoring (example--current) pins. In that case, I gathered like signal or control wires from the different channels, and ran them to consecutive pins on the Arduino sensor shield. The short gray wires going from the motor controller to the Arduino are actually two wiring harnesses.
If (when?) I do it again, I'll probably get prepinned wires from Pololu with more colors for some color coding, and make proper wiring harnesses.. The PVC jacket kept everything nice and tidy, but was a little stiff, and since I used that same cable to replace the servo wires, I may have some mobility issues in the arms later.
Does 100' for $65 seem
Does 100' for $65 seem reasonable?
I have a crimper, but its for shoe terminals - where do you get one for pins? And where do you get the pins. I got a batch of jumpers from Dagu - seemed like a good deal - but for long or custom spans I'd like to build it to length.
http://www.surplussales.com/wire-cable/Wire1.html
cond.
+ drain
foil, 300v / 600vPk, Audio
sound & control cable,
twisted conductors
I thought I replied to this a long time ago. . .
But there was a hurricane going on, and my electricity and internet were a little wonky that day.
This is the 3 conductor shielded plus drain wire I used for Houston's servo cables. When I needed a ground, I used the uninsulated drain wire.
http://www.allelectronics.com/make-a-store/item/3CS22/3-CONDUCTOR-SHIEL…
These are the parts I used to pin the cables. I actually used 1x3, 1x4 and 1x1 housings--depending on the connection.
http://www.pololu.com/catalog/product/1930
http://www.pololu.com/catalog/product/1902
This is the crimp tool I used. For the price it's not bad, tho I went over the crimped connections with a touch of a soldering iron.
http://www.allelectronics.com/make-a-store/item/CT-1/CRIMP-TOOL/1.html
Here's a better tool that would probably do a better job.
http://www.pololu.com/catalog/product/1928
Making all those cables was an exercise in tedium. If/when I do it again, I'll probably use these prepinned cables. They come in a variety of lengths and colors. After laying out the cables, I've thought about ways I could better color code them, and I have a better idea what lengths to use.
http://www.pololu.com/catalog/category/66
And Heeeeeeerrrrreee's
And Heeeeeeerrrrreee's Hooouuuussttoonnn......
Welcome Houstons very own Service module.
He's stronger faster, and 1000 x quicker than before.
With a single install of your bonifide Houston module - you have instant access to all the many ... many subcomponents.. All wrapped up in a convienent, slick package !
But Wait, There's More !
Jython code is reduced to just a few lines - almost anyone can type this !
Look at all that room to do more exciting stuff ! Like neural-nets, state machines and fuzzy logic !!!
But Wait, There's More !
Tired of moving motors one by one ? Got the move a single servo blues ?
whoah. . .
This is very cool. I mean. . .VERY cool.
And while, this is directed specifically to Houston, folks should realized that Houston is basically an Arduino Mega 2560, a $25 4 channel motor controller, some drive motors and servos, webcams and and an Xtion Live Pro (Like a Kinect) hanging off of a computer. It's got a lot of stuff, but it's stuff that anybody can get.
Thanks GroG
started service page
started service page - http://myrobotlab.org/service/houston
And started to understand myself the benefit an initialization of all sub - services.
933 - fixed dependency
933 - fixed dependency references for houston ...
So, you should not have to update everything - just right click on Houston and "install" ... although Houston does have quite a few :)