Power it Up
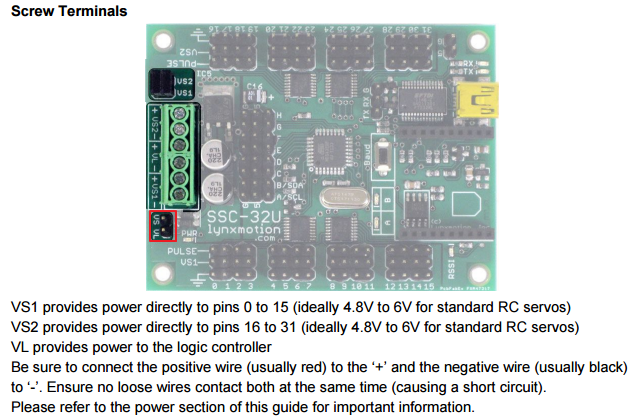
This is the power related pins. The servo pins are in two banks. You can isolate 3 power sources.
The power can be attached to :
- VS1 - servos 0 through 15
- VS2 - servos 16 trhough 31
- VL - logic chips
Jumper allow you to combine the power sources - so that you only need one power source to power everything. Sometimes with power isolation, you can protect or keep signals clean. The pins and jumpers allow you flexability.
Since I'll just be doing diagnostics and software, I'll be shorting the VL jumper and running it all on a single PSU 5V line.

The original configuration did not have a jumper on VS VL - so I added one. In the picture below, its the jumper with the red square around it.
Connect USB
Connect the usb cable. Its a FTDI chip at the core ... good old serial over usb.

Communication
It's all about communication. The ssc-32u has an interesting way to set the baud rate.
For a 180 degree servo:
- 500us long pulse (0.5ms) at 5V rotates the servo to -90 degrees
- 1500us pulse (1.5ms) sets the servo at 0 degrees.
- 2500us long pulse (2.5ms) at 5V rotates the servo to +90 degrees
Thank you Grog. An example for starting your servos on power up:
The below serial.write command will postion the servos on pins 0, 1, and 2 to the positions they should be to begin. This will initialise the servos and prep them for operation. Remember to change the position values to what your servos need to be set at.
serial = Runtime.start("serial","Serial")
serial.connect("/dev/ttyUSB0", 115200, 8, 1, 0)
serial.write("#0P800 #1P1500 #2P1100 \r")
Once the servos have been initialised and set to their starting positions, you can then give more detailed commands to the servo controller, such as speed or timing if commanding a group of servos on a single line.
This will help to prevent any major jumps in the servos that could possibly damage them.
# = pin/channel to which the servo is connected (0 - 31)
P = desired pulse width (position) (normally 500 to 2500) in microseconds
S = servo movement speed in microseconds per second
T = time in microseconds to travel from the current position to the desired position. This affects all servos in a group, so they all reach their desired positions at the same time. Handy for group movements such as walking.
\r = carriage return
PO = Position Offset - You have your servo attached and ready to go, but you find what should be center, e.g. 1500... is not exactly center... you can set the PO for that servo to center it at the beginning of your script and for the duration the controller is powered it will remember that to center that servo when the position 1500 is used, it should be offset be however many degrees, up to about 15 degrees.
References :
In the same
In the same idea...
http://www.robot-electronics.co.uk/htm/sd84tech.htm
Do you have that one Dom ?
Do you have that one Dom ?
No sorry. When i start
No sorry.
When i start InMoov, i would like use it.
But after reflection arduino was easier because well integrated MRL.
Dom.
Something else to order.
Something else to order. Thanks for sharing that link.
#!/usr/bin/python # Import
#!/usr/bin/python
# Import the Serial module
import serial;
EOL = "\r";
command = "";
# Set the SSC-32 port - e.g. "COM1:" for Windows, "/dev/ttyS0" for Linux
SSC32_Port = "/dev/ttyUSB0";
ServoOne = 0;
ServoOneStop = 1520;
ServoTwo = 1;
ServoTwoStop = 1525;
ServoThree = 2;
ServoThreeCenter = 1530;
ServoThreeMin = 2150;
ServoThreeMax = 900;
ServoFour = 3;
ServoFourCenter = 1430;
ServoFourMin = 500;
ServoFourMax = 1550;
# Reads single characters until a CR is read
def Response (port):
ich = "";
resp = "";
while (ich <> '\r'):
ich = port.read(1);
if (ich <> '\r'):
resp = resp + ich;
return resp;
# Wait for a servo move to be completed
def Wait_for_Servos (port):
ich = "";
while (ich <> "."):
Send_Command (port, "Q", True);
ich = port.read(1);
return;
# Send EOL to the SSC-32 to start a command executing
def Send_EOL (port):
result = port.write(EOL);
return result;
# Send a command to the SSC-32 with or without an EOL
def Send_Command (port, cmd, sendeol):
result = port.write (cmd);
if (sendeol):
Send_EOL (port);
return result;
# Open the port at configured Bps - defaults to 8N1
ssc32 = serial.Serial(SSC32_Port, 9600);
# Motors All Stop - Left = Ch0, Right = Ch1
command = "#" + str(ServoOne) + " P" + str(ServoOneStop) + " #" + str(ServoTwo) + " P" + str(ServoTwoStop);
Send_Command (ssc32, command, True);
Wait_for_Servos (ssc32);
# Home the PING Pan/Tilt Base
command = "#" + str(ServoThree) + " P" + str(ServoThreeCenter) + " #" + str(ServoFour) + " P" + str(ServoFourCenter);
Send_Command (ssc32, command, True);
Wait_for_Servos (ssc32);
# Send the version command
command = "ver";
Send_Command (ssc32, command, False);
Send_EOL (ssc32);
# Read the response
inp = Response(ssc32);
# Show what we got back
print inp;
command = "#" + str(ServoThree) + "P1900" + "#" + str(ServoFour) + "P1300 T5000"
Send_Command (ssc32, command, True);
Wait_for_Servos (ssc32);
# Close the port
ssc32.close();