The Servo service is used to control servos through a micro-controller such as an Arduino or a Raspberry pi (ServoController).
The service will allow to control attaching or detaching the device, control his position and the speed at wich it move to that position, and turn off/on the servo.
servo.attach(controller, pin, pos, velocity): Initial servo device attachement to the microcontroller
servo.detach(controller): detach the servo from the microcontroller
servo.enable(): will turn the servo motor on
servo.disable(): will turn the servo motor off
servo.moveTo(pos): ask the servo to move to a position
servo.moveToBlocking(pos): ask the servo to move to a position and wait the position reached
servo.map(inputMin, inputMax, outputMin, outputMax): default to (0,180, 0, 180). Allow to map a range to a valid output range that can be understand by the servo. The outputMin and outputMax must have value between 0 and 180.

servo.setInverted(true/false): Reverse the direction of rotation of the servo.
Look at sample script bellow for others commands !
Setup
Connect the signal wire to a pin on the controller
Connect the (+) wire to the (+) of a power source (battery or power supply)
Connect the (-) wire to the ground of a power source AND the ground of the controller
Servo needs a lot of current and require to be connect to a power source that can provide enough current. The controllers (Arduino or Raspberry pi) are not strong enough to make the servo work properly and you should avoid connecting the 5V of the controller to the servo.

Speed control
servo.setVelocity(degree/s): Will force the servo to rotate at the specify velocity. If the speed specify is faster than the servo capability, the servo will turn at a lower speed than expected. The value -1 will bypass the speed control and have the servo rotate normally.
This is a common Servo service. All simple Servos need to attach to a ServoController. Currently, the list of ServoControllers are :
- Arduino
- AdafruitMotorShield - although this is just a passthrough to the Arduino pin 9 & 10
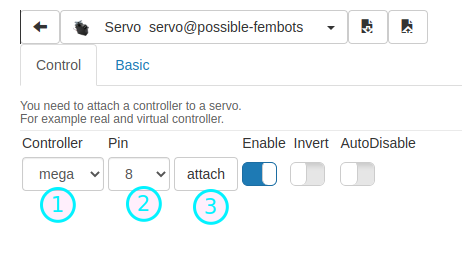
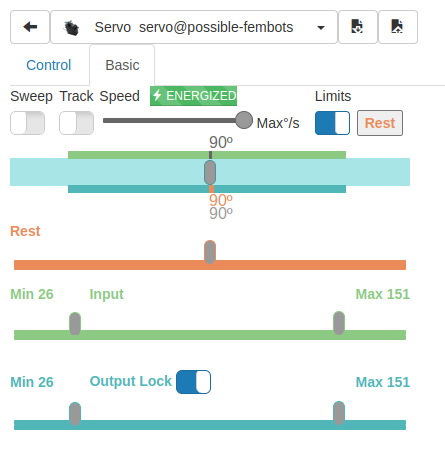
The Servo needs a controller in order to operate. You should be able to select one in the drop down. Select the correct signal pin the servo is attached to. Then select "attach" and the servo should be controllable with the slider bar. Limits can be set in order to protect the servo from going beyon a certain minimum and maximum value.
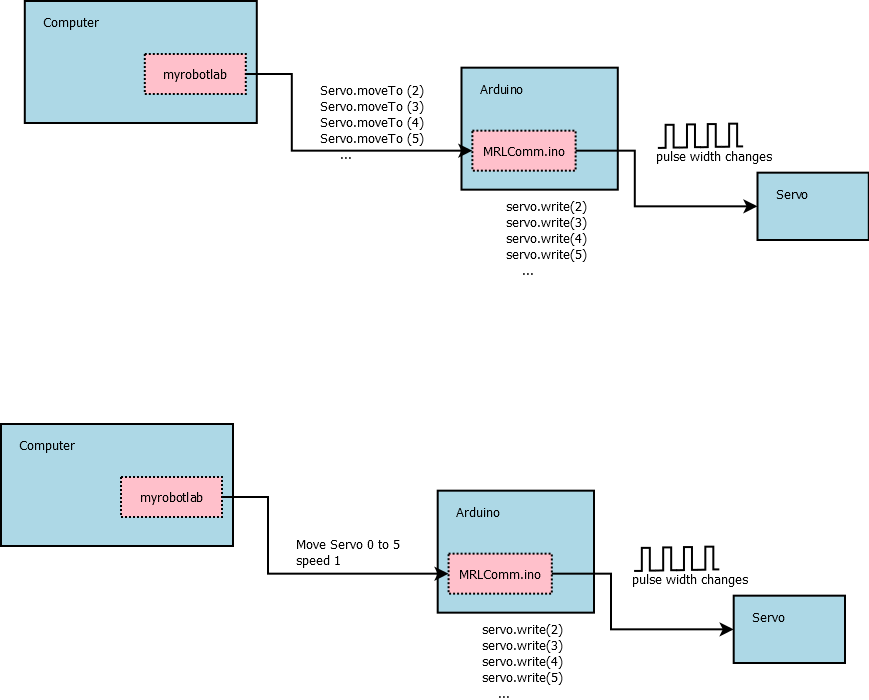
Modular Block Diagram showing the differences of sweeping a Servo from MyRobotLab versus sweeping it from the microcontroller (Arduino)
Acceleration option for servo's
Is there a easy way to include a acceleration option in this Servo service or in a service from InMoov ?
Most servo's will start direct in full speed to move to the new position.
This gives a higher risk to burn a servo !
Hi Marteen I asked myself the
Hi Marteen I asked myself the same thing :) .
I think we can do increase speed in a thread for smoth gesture ( servo start )
but we don't know when the servo reach the position to descelerate. ( the only way is to read maybe the potentiometer value ? )
Hi Anthony,The main problem
Hi Anthony,
The main problem is the lower resolution, when we only use the 0<>180 degree step resolution in default !
For some functions it would be interesting to use the full microseconds function.
This gives more freedom to play with some settings in acceleration options.
And there is more precision because of the "5 times" higher resolution :)
2400 - 544 = 1856 microseconds
1856 / 180 = 10,3 microseconds per degree
Most servo's have a deadband from 2 microseconds, so this is the minimum stepsize.
10,3 / 2 = 5,15
I don't think we need the feedback from the potentiometers.
We only need to now how many degrees we need to make from position A to B.
If there is a option to use the "look a like" servo setSpeed function like we have in the default servo service, it would be nice.
I'm not that perfect in programming yet and Phyton is new to me...
So I don't now the limitation.