Most builders of the InMoov robot have eventually installed the NeoPixel ring with 16 Pixels in the stomach.
When working, these little multi colored LED unit can look very impressive.\
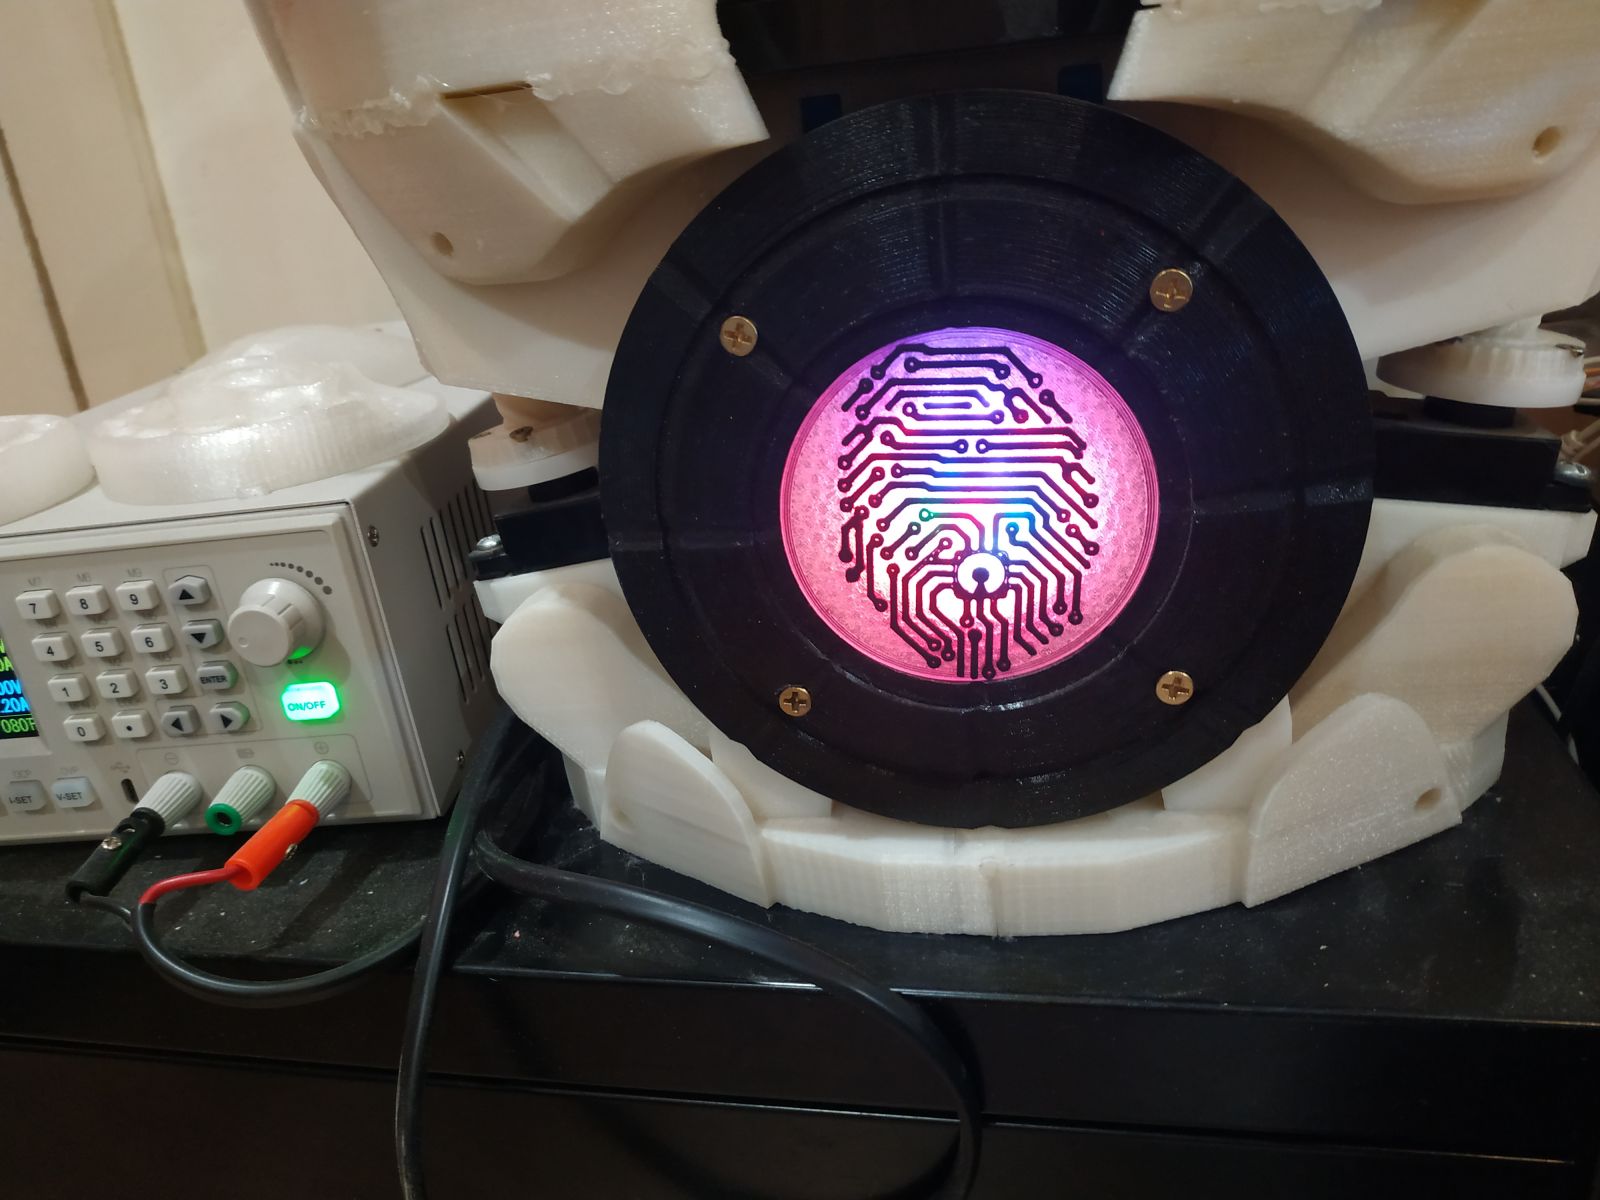
As Part of Fred's program, I also wanted to use these marvelous devices.
Of course I had to be different :-) and add extra NeoPixels to the ring.
For this I added a 7 pixel button to the middle of the 16 pixel ring giving a total of 23 pixels.
The Dout of the 16 pixel ring is connected to the Din of the 7 pixel button.
To make sure there was enough power I also added a XL4005 DC-DC buck SMPS rated at 4 Amps.
I'll add al link to the video when it's released :-)
 
The Din of the 16 Pixel ring was connected to D8 of the Arduino Nano located in Fred's chest.
This Arduino also controls two Ultra Sonic range sensors D9 - D12 and a single PIR sensor on D2
 
Running with MRL_Nixie installed on a Raspberry Pi 4 with 8GB or RAM running Raspbian Buster 32Bit.
 
The full source code for Fred can be found here:
 
First thing I did was configure the settings I will be using for the NeoPixels.
 
EnableStomachNeoPixel = True
StomachNeoPixelAttachment = "arduinoNano"   # This was attached to a secondary board
StomachNeoPixelPin = 8                      # 2
StomachNeoPixelNumber = 23                  # 16
StomachNeoPixelMode = 0                     # This is how we will use the Neopixel ring/s
 
Next we start the service for the NeoPixels
# Test to make sure the configured controller is enabled.
if not ((StomachNeoPixelAttachment == "arduinoNano" and EnableArduinoNano) or (StomachNeoPixelAttachment == "arduinoLeft" and EnableArduinoLeft) or (StomachNeoPixelAttachment == "arduinoRight" and EnableArduinoRight)):
EnableStomachNeoPixel = False
if EnableStomachNeoPixel:
StomachNeoPixel = Runtime.start("StomachNeoPixel","NeoPixel")
if StomachNeoPixelAttachment == "arduinoNano":
StomachNeoPixel.attach(arduinoNano, StomachNeoPixelPin, StomachNeoPixelNumber)
if StomachNeoPixelAttachment == "arduinoLeft":
StomachNeoPixel.attach(arduinoLeft, StomachNeoPixelPin, StomachNeoPixelNumber)
if StomachNeoPixelAttachment == "arduinoRight":
StomachNeoPixel.attach(arduinoRight, StomachNeoPixelPin, StomachNeoPixelNumber)
view raw IO.py hosted with ❤ by GitHub
Because I want to have different modes of operation, I defined the StomachNeoPixelMode.
Mode 0 will be used as a user configurable diagnostic mode of sorts
For now the other modes are just running the built in animations.
Before I can use the user configurable diagnostic mode, I first have to configure it :-)
# NeoPixel Diagnostic Mode Config
# We use a multi dimensional array to configure the NeoPixels
# configuration.
# Each pixel needs to have is configuration defined.
# We start with the function:
# 0 = not used
# 1 = Left Ultrasonic Range
# 2 = Right Ultrasonic Range
# 3 = PIR, this is on or off, so the preset value is ignored.
# 4 = Battery Level
# 5 = Set Pixel color static, Value is ignored and only the first set of colors are used.
# Next the preset value, The Neopixel will change color based
# on this value. Then the color when above and the color
# when below the preset value.
# Each color consists of 3 values, Red, Green and Blue with a
# range of 0 - 255, all 0 = off
# [Function, Value, R_low, G_Low, B_Low, R_High, G_High, B_High]
NeoPixelDiagConfig = [1, 200, 0, 0, 200, 10, 0, 0], # pixel 1
[1, 150, 0, 0, 200, 10, 0, 0], # Pixel 2
[1, 100, 0, 0, 200, 10, 0, 0], # Pixel 3
[1, 75, 0, 0, 200, 10, 0, 0], # Pixel 4
[1, 50, 0, 0, 200, 10, 0, 0], # Pixel 5
[1, 25, 0, 0, 200, 10, 0, 0], # Pixel 6
[1, 10, 0, 0, 200, 10, 0, 0], # Pixel 7
[3, 0, 10, 0, 10, 200, 200, 0], # Pixel 8
[3, 0, 10, 0, 10, 200, 200, 0], # Pixel 9
[2, 10, 0, 0, 200, 10, 0, 0], # Pixel 10
[2, 25, 0, 0, 200, 10, 0, 0], # Pixel 11
[2, 50, 0, 0, 200, 10, 0, 0], # Pixel 12
[2, 75, 0, 0, 200, 10, 0, 0], # Pixel 13
[2, 100, 0, 0, 200, 10, 0, 0], # Pixel 14
[2, 150, 0, 0, 200, 10, 0, 0], # Pixel 15
[2, 200, 0, 0, 200, 10, 0, 0], # Pixel 16
[4, 050, 50, 0, 0, 20, 50, 0], # Pixel 17
[5, 0, 10, 0, 0, 0, 0, 0], # Pixel 18
[5, 0, 0, 10, 0, 0, 0, 0], # Pixel 19
[5, 0, 0, 0, 10, 0, 0, 0], # Pixel 20
[5, 0, 10, 0, 10, 0, 0, 0], # Pixel 21
[5, 0, 0, 10, 10, 0, 0, 0], # Pixel 22
[5, 0, 10, 10, 10, 0, 0, 0]] # Pixel 23
view raw IO.py hosted with ❤ by GitHub


Once this is all configured, we can run the section of program that runs the NeoPixels.
if EnableStomachNeoPixel:
def NeoPixelTimerEvent(timedata):
global LastNeoPixelMode
global StomachNeoPixelMode
global LastLeftPing
global LastRightPing
global PIRstate
global BatteryLevel
if StomachNeoPixelMode == 0:
if LastNeoPixelMode <> StomachNeoPixelMode:
StomachNeoPixel.animationStop()
LastNeoPixelMode = StomachNeoPixelMode
for Pixel in range(0, min(len(NeoPixelDiagConfig), StomachNeoPixelNumber)):
StomachNeoPixel.setPixel(Pixel+1, 100, 100, 100)
StomachNeoPixel.writeMatrix()
for Pixel in range(0, min(len(NeoPixelDiagConfig), StomachNeoPixelNumber)):
StomachNeoPixel.setPixel(Pixel+1, 0, 0, 0)
StomachNeoPixel.writeMatrix()
for Pixel in range(0, min(len(NeoPixelDiagConfig), StomachNeoPixelNumber)):
if NeoPixelDiagConfig[Pixel][0] == 0: # Not Used
StomachNeoPixel.setPixel(Pixel+1, 0, 0, 0)
elif NeoPixelDiagConfig[Pixel][0] == 1: # Left UltraSonic Range
if LastLeftPing < NeoPixelDiagConfig[Pixel][1]:
StomachNeoPixel.setPixel(Pixel+1, NeoPixelDiagConfig[Pixel][2], NeoPixelDiagConfig[Pixel][3], NeoPixelDiagConfig[Pixel][4])
else:
StomachNeoPixel.setPixel(Pixel+1, NeoPixelDiagConfig[Pixel][5], NeoPixelDiagConfig[Pixel][6], NeoPixelDiagConfig[Pixel][7])
elif NeoPixelDiagConfig[Pixel][0] == 2: # Right UltraSonic Range
if LastRightPing < NeoPixelDiagConfig[Pixel][1]:
StomachNeoPixel.setPixel(Pixel+1, NeoPixelDiagConfig[Pixel][2], NeoPixelDiagConfig[Pixel][3], NeoPixelDiagConfig[Pixel][4])
else:
StomachNeoPixel.setPixel(Pixel+1, NeoPixelDiagConfig[Pixel][5], NeoPixelDiagConfig[Pixel][6], NeoPixelDiagConfig[Pixel][7])
elif NeoPixelDiagConfig[Pixel][0] == 3: # PIR Detection
if not PIRstate:
StomachNeoPixel.setPixel(Pixel+1, NeoPixelDiagConfig[Pixel][2], NeoPixelDiagConfig[Pixel][3], NeoPixelDiagConfig[Pixel][4])
else:
StomachNeoPixel.setPixel(Pixel+1, NeoPixelDiagConfig[Pixel][5], NeoPixelDiagConfig[Pixel][6], NeoPixelDiagConfig[Pixel][7])
elif NeoPixelDiagConfig[Pixel][0] == 4: # Battery Voltage
if BatteryLevel < NeoPixelDiagConfig[Pixel][1]:
StomachNeoPixel.setPixel(Pixel+1, NeoPixelDiagConfig[Pixel][2], NeoPixelDiagConfig[Pixel][3], NeoPixelDiagConfig[Pixel][4])
else:
StomachNeoPixel.setPixel(Pixel+1, NeoPixelDiagConfig[Pixel][5], NeoPixelDiagConfig[Pixel][6], NeoPixelDiagConfig[Pixel][7])
elif NeoPixelDiagConfig[Pixel][0] == 5: # Set Pixel Color
StomachNeoPixel.setPixel(Pixel+1, NeoPixelDiagConfig[Pixel][2], NeoPixelDiagConfig[Pixel][3], NeoPixelDiagConfig[Pixel][4])
StomachNeoPixel.writeMatrix()
elif StomachNeoPixelMode == 1:
if LastNeoPixelMode <> StomachNeoPixelMode:
LastNeoPixelMode = StomachNeoPixelMode
StomachNeoPixel.setAnimation("Rainbow Cycle", 255, 0, 0, 1) #running Theater Chase with color red at full speed
elif StomachNeoPixelMode == 2:
if LastNeoPixelMode <> StomachNeoPixelMode:
LastNeoPixelMode = StomachNeoPixelMode
StomachNeoPixel.setAnimation("Larson Scanner", 255, 0, 0, 1) #running Theater Chase with color red at full speed
elif StomachNeoPixelMode == 3:
if LastNeoPixelMode <> StomachNeoPixelMode:
LastNeoPixelMode = StomachNeoPixelMode
StomachNeoPixel.setAnimation("Theater Chase Rainbow", 255, 0, 0, 1) #running Theater Chase with color red at full speed
else:
if LastNeoPixelMode <> StomachNeoPixelMode:
LastNeoPixelMode = StomachNeoPixelMode
StomachNeoPixel.setAnimation("Flash Random", 255, 0, 0, 1) #running Theater Chase with color red at full speed
NeoPixelTimer = Runtime.createAndStart("NeoPixelTimer", "Clock")
NeoPixelTimer.addListener("pulse", python.name, "NeoPixelTimerEvent")
NeoPixelTimer.setInterval(1000)
NeoPixelTimer.startClock(False)
view raw IO.py hosted with ❤ by GitHub


This program works, but here are a few little bugs and traps to be aware of and how to work around them :-)
 
  • First of the bugs,
    NeoPixel.writeMatrix() is supposed to write all the NeoPixels that were set by the NeoPixel.setPixel(Addr, R, G, B).
    The theory is you can set a number of pixels, then write the lot out in one go.
    This does not work.  The results will be most of the pixels being turned off and a random pixel or two being set to the desired color.
    The work around is the call the NeoPixel.writeMatrix() after each NeoPixel.setPixel(Addr, R, G, B).
     
  • Once you have started an Animation with NeoPixel.setAnimation(Animation Name", red, green, blue, speed) Don't call the command again.
    A call to the same command will reset the animation back to the start of it's sequence. 
    This is not a bug, but you do need to be aware of this when you have a timer poling your NeoPixel routines :-)
     
  • When switching back to setPixel method of operation, remember to first stop the animation.
    Use the NeoPixel.animationStop(), but don't keep calling it, it will keep clearing all your pixels back to off. :-)
     
  • If you had been using the setPixel method before starting an animation, then stop the animation, the NeoPixel.setPixel(Addr, R, G, B) remembers that last setting you used and will not update the setting un less it's changed.
    That means if you had a pixel set to  (10, 0, 0) after the animation has been stopped, setting this color again will not turn it back on.
    The work around is to set all the pixels to a preset value writing each one out then setting each one to off again writing the setting out for each pixel.
    After that each pixel will work as expected.
 
These can be a fun device to work with and can be used to show your robots mood or status.
 
Don't forget to have fun building :-)
 

GroG

3 years 10 months ago

Great post Ray,
Informative and well written.  I'll be playing with neopixels soon too.
I a couple 8 strips I have a purpose for ..

and I'm also strategizing how to not have code copy/pasted in posts - always better to have references to code in a repo with syntax highlighting ...

I was looking into "gists"  from github, it looks promising, but haven't tested anything yet.

you've inspired me to hook one up here too.. every robot needs it's own arc-reactor looking thing-a-ma-bob.