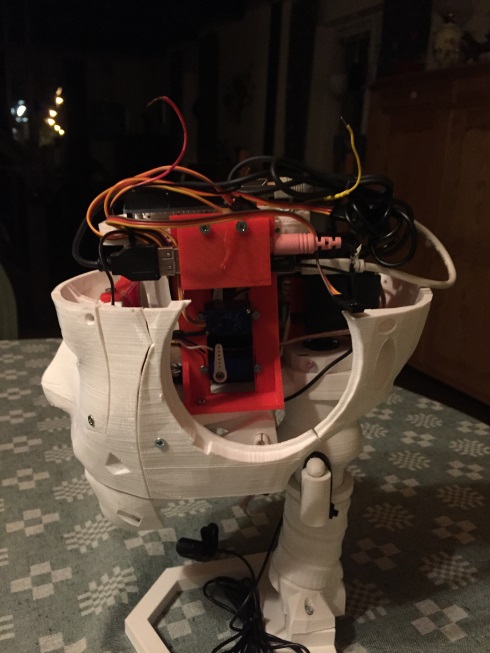
It now contains 5 servos, a Raspberry PI, an Arduino Uno, a USB soundcard, a sound amplifier and a speaker.It will also contain one Raspberry PI Camera in one of the eyes. Work in progress :-)
Yes. First I removed the cogwheels and replaced and relocated the servo that turns the head sidewise with a standard size servo. Then I modified the hinges to the jaws to be able to move the jaw servo away. After that there was room for the rest. The Raspberry is mounted upside down under the Ardino. I took the speaker element from Roxcore Portasond speaker and made a separate speaker box that is monted behind the jaw. The amplifier was put in a separate box at the back of the head. The USB soundcard is mounted on the side of the bracket holding the Raspberry / Arudino. The servos for the eyes are mounted on the same brackets. The eye mechanism is also redesigned, based on some animatronic heads that I have seen. I will publish the changes on Thingiverse soon.
I'll be really interested to see your changes on Thingiverse. I felt from the start that much of the head space is wasted with such a large servo in there. Plus the wiring from my eye cameras runs the risk of getting caught in the jaw mechanism.
I have made a post http://www.thingiverse.com/thing:992918 that shows the modified parts of the InMoov head. I will make more posts with the parts that I have created or used to mount the Raspberry / Arduino and other electronics. I'm waiting for parts to finish the modified eye mechanism.
I like the look of the changes, Are the original outer parts of the skull unchanged? and does the top of the skull still fit?
I'm considering waylaying my current build to try your redesigned head, I particularly like the speaker behind the mouth which would mean sound comes from the area expected.
All the outer parts are unchanged on the exterior. The inside of the two neck parts are modified to allow for a standard size servo to be mounted. The jaw may have to be reprinted. The top of the skull still fits, but the part that hold the skull together has to be replaced, since the original is part of the servo holder. All the parts that needs to be reprinted if you already have built the head are in this post: http://www.thingiverse.com/thing:992918.
I will write better instructions there.
If you want to use the space freed up for other things, like the speaker, you can still use the original eye mechanism.
But if you want to make all the changes that I have made, the you also need to use a different eye mechanism and reprint the parts around the eye. But still no modification to the exterior.
I send No Worky. pls. have a look and give feedback what could be the problem. Since it is not moving JAW in normal position and also in Inverted position.
 It now contains 5 servos, a Raspberry PI, an Arduino Uno, a USB soundcard, a sound amplifier and a speaker.It will also contain one Raspberry PI Camera in one of the eyes. Work in progress :-)
Wow that is a lot crammed in
Wow that is a lot crammed in there, you must have reconfigured the insides by a huge amount.
Inmoov head modifications
Yes. First I removed the cogwheels and replaced and relocated the servo that turns the head sidewise with a standard size servo. Then I modified the hinges to the jaws to be able to move the jaw servo away. After that there was room for the rest. The Raspberry is mounted upside down under the Ardino. I took the speaker element from Roxcore Portasond speaker and made a separate speaker box that is monted behind the jaw. The amplifier was put in a separate box at the back of the head. The USB soundcard is mounted on the side of the bracket holding the Raspberry / Arudino. The servos for the eyes are mounted on the same brackets. The eye mechanism is also redesigned, based on some animatronic heads that I have seen. I will publish the changes on Thingiverse soon.
Impressive - thanks for
Impressive - thanks for posting. Will be interesting to see what you can get out of the RasPi cam module
I'll be really interested to
I'll be really interested to see your changes on Thingiverse. I felt from the start that much of the head space is wasted with such a large servo in there. Plus the wiring from my eye cameras runs the risk of getting caught in the jaw mechanism.
Modified head now on Thingiverse
I have made a post http://www.thingiverse.com/thing:992918 that shows the modified parts of the InMoov head. I will make more posts with the parts that I have created or used to mount the Raspberry / Arduino and other electronics. I'm waiting for parts to finish the modified eye mechanism.
I like the look of the
I like the look of the changes, Are the original outer parts of the skull unchanged? and does the top of the skull still fit?
I'm considering waylaying my current build to try your redesigned head, I particularly like the speaker behind the mouth which would mean sound comes from the area expected.
The outside is unchanged
All the outer parts are unchanged on the exterior. The inside of the two neck parts are modified to allow for a standard size servo to be mounted. The jaw may have to be reprinted. The top of the skull still fits, but the part that hold the skull together has to be replaced, since the original is part of the servo holder. All the parts that needs to be reprinted if you already have built the head are in this post: http://www.thingiverse.com/thing:992918.
I will write better instructions there.
If you want to use the space freed up for other things, like the speaker, you can still use the original eye mechanism.
But if you want to make all the changes that I have made, the you also need to use a different eye mechanism and reprint the parts around the eye. But still no modification to the exterior.
I have posted the second part now:
http://www.thingiverse.com/thing:994720
The downside of my changes is that the cables can no longer go thru the neckbone.
And some software changes...
modified head mouth servo working revers
Hi Mats,
i printed the modified head and assemble the same. But when we connect it the jaw servo work revesly.
even we check it in servo calibration when i select servo at 0 position the jaw is in total open condition and when i secect at 180 it close jaw.
pls. let me know if any changes in config file or any other file i will do to work it properly.
regards,
sunil
Reverting a servo
In the file <MRL home folder>\InMoov\Config\_skeleton_head.config.
Find the section [SERVO_INVERTED]
and change to
jaw=True
hi mats, i change the config
hi mats,
i change the config file while inittalize it move jaw perfect but after that it will not work what could be the problem .
hi Mats , The Modified head
hi Mats ,
The Modified head is working fine thanks a lot.
regards,
Hi Mats sir, I send No Worky.
Hi Mats sir,
I send No Worky. pls. have a look and give feedback what could be the problem. Since it is not moving JAW in normal position and also in Inverted position.
thanks.