Update on July 2014:
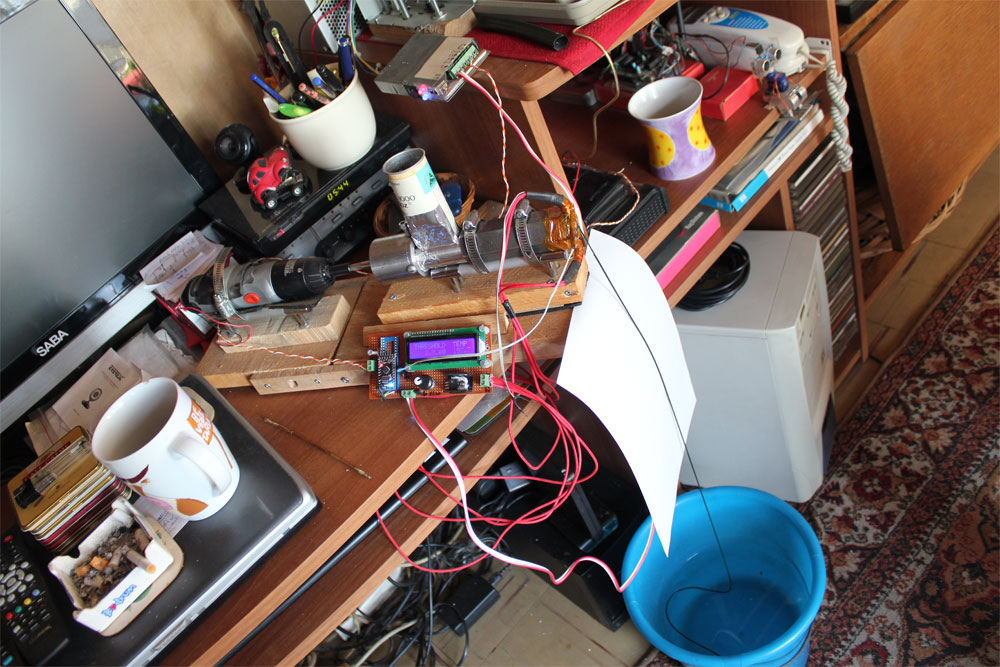
At last I found some time to finish up and test my filastruder... Tested with recycled plastic pellets at PID values: 200 degrees C +-10 degrees... Managed to extrude 1,70mm usable filament at first test run...
Youtube link of test run video: http://youtu.be/-0N7ihcV2Zo
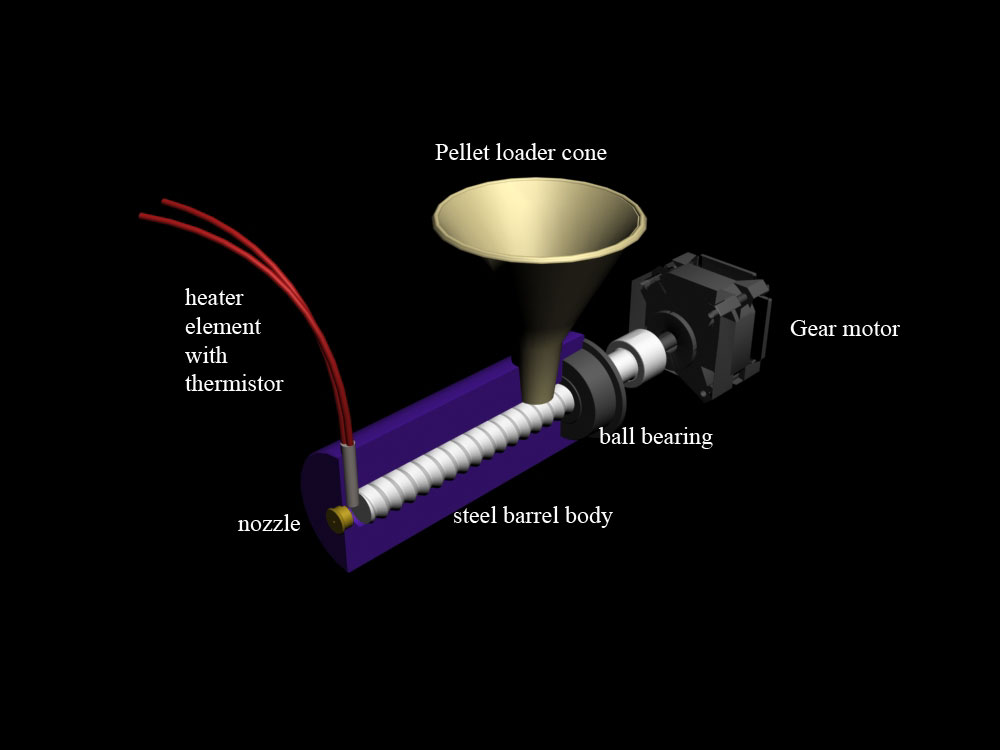
We all know that filament is the most important part of 3d printing... And we also know that these are neither cheap nor easily accessible... So I decided to make my own homemade filament extruder. After some search on internet, I decided to use this simple design which is the core of many commercial filastruders. I prepared a simple cad model for you to conceptualize the design easily. All these parts are easily found at every DIYer's parts bin. Only serious design I made is the steel barrel body which is now being made by one of my friends who has a lathe. As can be understood, plastic pellets (or small cut plastic) is loaded from the upper cone and the screw carries them to the front where they are being melt and forced out of a brass nozzle (a natural gas or propane nozzle mainly) to form a filament.
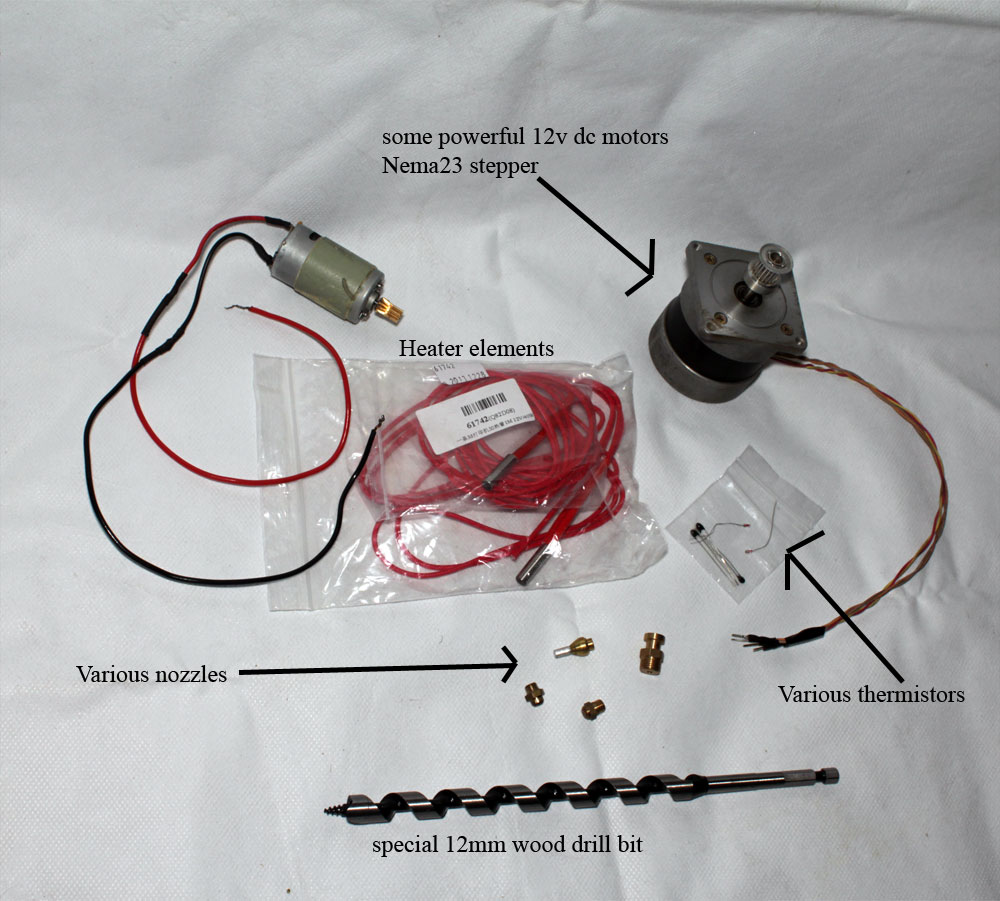
According to my calculations system can be driven with a powerful dc gearmotor or a big stepper like the one in the pic (nema23). Even a household drill can drive the system for few hrs... I designed the system to make 1.75mm filament and found nozzles that can do the job. the radius of output filament can be monitored by a sensor for accuracy but I do not think I will need that as long as the shaft is driven at constant speed... As for the heating control, I decided to use the same ceramic 12v heaters and 100k thermistors used in reprap printer extruders (actually there will be more than one on the front end around nozzle). There are simpler and cheaper solutions for heat control, such as constant temp PTC thermostats but as the name implies these are made to keep the heating at a constant temp. Actually I want to make tests for different types of plastics ( including waste palstics such as PE bottles) that is why I decided to have Arduino controlled heater&thermistor combination under PID control because various plastics will need different melting temps. At this point I need help from this community to achieve a MRL PID service controlled temperature management. I could have used my Ramps 1.4 controller for the purpose but I don't have a spare Ramps and wanted to make this machine totally independent of my 3d printer... I am not good at Phyton scripting and any help will be appreciated...
Hi borsaci, as you know i
Hi borsaci, as you know i control my 3d printer heater&thermistor using MRL...
I use a python script which check for thermistor temp every 2/ 3 seconds and turn on/off a relay connected to the heater...
So i'm not using PID service, but just Arduino service which turns on the heater when temp is under 110 °C and turns it off when the temp is over 120 °C.
Are you interested in this kind of control or you want to PID it using a POWER MOSFET instead of the relay?
I can share the script is actual controlling my printer if you want :D
Alessandro
PID script...
Aless,
I have not yet decided about the relay vs mosfet circuit but anything will help... I actually want to use PID control with power mosfeet but relay thing is easier... there are circuits like this one:
Can you pls send your script and connection scheme? I want to take a look at your solution ....
Dincer
wow...that scheme it's a bit
wow...that scheme it's a bit compicated... i was wondering of a single mosfet control, with a variable voltage on the gate (proportional to the temp read by the thermistor) , which regulate the current which goes to the heater...
I'll post my relay solution here , so others can benefit too...
Here is the script
Here is the script :
Numbers (120, 150) are not
Numbers (120, 150) are not the values of the temperatures, but the analog number (0-1024) corresponding to the temp you want
PID script...
Thx Aless,
I will have a detailed look at this and how it works... I understood the cutoff values, I have to find my custom ones coming from my thermistor and choose accordingly... you are also right about the above multi transistor circuit. It is a bit crowdy, a single mosfet solution can be better...
Dincer
(No subject)
Just curious
Do you use 2 arduino uno r3 to conytal your printer, Or what do you use for the stepper control.
I use an arduino mega + ramps
I use an arduino mega + ramps to control the 5 stepper motors and the heater/thermistor of the extruder...
Then i use an arduino UNO to control heater/thermistor of the heated bed using mrl.
Heated bed PID...
Aless,
Why do you use a different Arduino for bed heating control?... Mega+Ramps system with Marlin does very efficient PID for both extruder heater and bed heater... Or are we talking about different Marlin versions?
My Marlin version: Marlin_3_14_14
ehehe :) good question... the
ehehe :) good question... the problem is not about the software but the hardware... i fried the 10 A mosfet of the ramps with a short :D so i needed another system :)
Bed heater PID...
Hmmmm, now I understood why you are using another control system for your heated bed... But still I think soldering a new $1 mosfet there should not be a problem for you.... :)
Borsaci, sometimes i act not
Borsaci, sometimes i act not in the easier way but in the funniest :) i m young... I m full of energy and i m hungry of knowledge :)
My printer....
Adolph,
I am using Arduino mega with Ramps1.4 shield as everyone in the reprap community...
Dincer,
Not me, i did have the mega
Not me, i did have the mega with ramps, but im converting my system to the due with a radds shield, its a similar system as the mega, but then with the benefits of the due and faster, better stronger and more power. But its assembled, and im testing it now, and looking good!!! Im thinking that in the future, a bit more powerfull controller can control more motors, thermocouples, and so on. Only drawback is no eeprom. And for €90 its not too expensive!
I'm using the Melzi-Board. It
I'm using the Melzi-Board. It is doing it's job very well. I had absolutely no problems with it yet (it is running nearly a year). Yes it is a bit of cheating ; ).
Mosfet heater controller...
I made an alternative heater controller circuit with MOSFET PID control...
And the code for anyone interested:
Scraps.....
Wow this is fantastic....... that extruder is soooo fast....
I knew there was a reason for me not to throw away all my plastic "
Mistake" test prints.Keep up the good work ...
....G
My filastruder...
thx Gareth... nowadays I am not also throwing away any detergent bottles and water bottlecaps too... :)
So I am not worrying about different color filaments...
Dincer
Colour is over_rated ;-)
Its often the case that I know that I am only making a test print ... so the colour is not so important.