UPGRADE 01/02/2014
Hello friends! ![]()
.jpg)
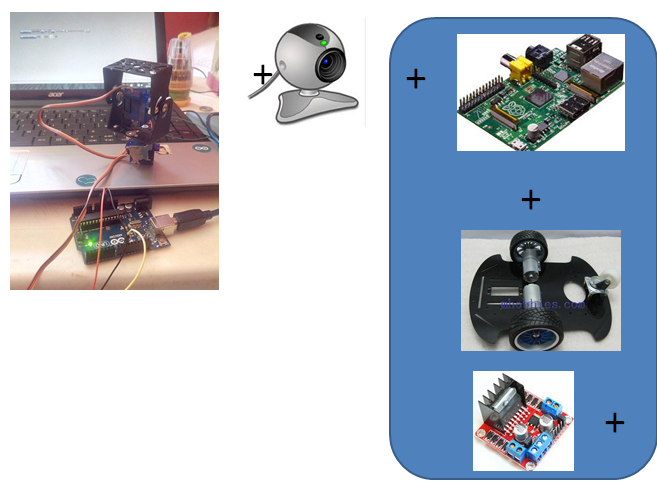
I was talking with colleagues about the MRL an idea of robot based on computer vision. Since then I have some parts that can collaborate with this project ... as the image below.
The pieces I have are:
Support Pan / Tilt
raspberry Pi
Arduino
L298N Motor Drive
webcam
Robot Chassis (2 DC motors)
Using MRL within the Linux on Raspberry Pi can I get something?
Some suggestions? ideas? I want to work!
UPDATE - 1 / 02 / 2014
DC Motors, H Bridge and GPIO (BLUE)

I'm back!
I was looking for some code on the internet to test my L298N, got some information of how to control DC motors directly from GPIO input of your Raspberry Pi.
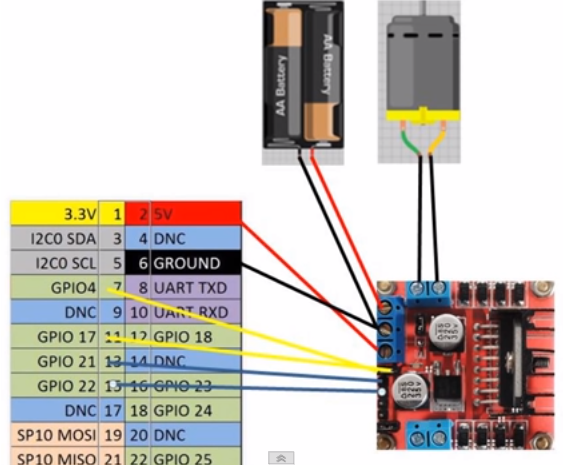
First Test with a DC Motor:

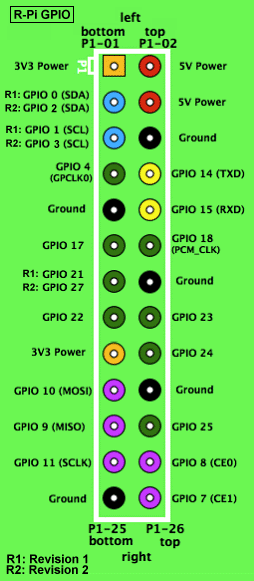
Follow the GPIO green pins for put correctly the jumpers...
This scheme can help:

Video tuto:
Description of L298N
I created a Python code:
# Autor: Saymon Cristian Alves Oliveira
# Codigo para controlar 2 motores DC com um driver L298N
# Via RaspBerry Pi - aplicado ao Modelo B - GPIO
# Crie funções(def direita, def esquerda, def frrente, def trás ou def parar) para automatizar o código
#Importando bibliotecas
import RPi.GPIO as gpio
import time
#Configura o modo da GPIO
gpio.setmode(gpio.BOARD)
#---------------------------------------
#Declara pinos como saida GPIO - Motor A
#pino de ativação do motor A via Rasp 1
gpio.setup(7, gpio.OUT)
#pino de ativação do motor A via Rasp 2
gpio.setup(11, gpio.OUT)
# Iniciar Pino 13 como saida - Motor A
gpio.setup(13, gpio.OUT)
#Iniciar Pino 15 como saida - Motor A
gpio.setup(15, gpio.OUT)
#---------------------------------------
#Declara pinos como saida GPIO - Motor B
#pino de ativação do motor B via Rasp 1
gpio.setup(12, gpio.OUT)
#pino de ativação do motor B via Rasp 2
gpio.setup(16, gpio.OUT)
# Iniciar Pino 18 como saida - Motor B
gpio.setup(18, gpio.OUT)
#Iniciar Pino 22 como saida - Motor B
gpio.setup(22, gpio.OUT)
#-----------------------------------------
# Permitir que o L298N seja controlado pelo GPIO:
#---------------------------------------
#Valores iniciais - True - Motor A ativado
gpio.output(7, True) #Motor A - Rasp 1
gpio.output(11, True) #Motor A - Rasp 2
#---------------------------------------
#Valores iniciais - True - Motor B ativado
gpio.output(12, True) #Motor B - Rasp 1
gpio.output(16, True) #Motor B - Rasp 2
#---------------------------------------
while True:
# frente
gpio.output(18, True)
gpio.output(22, False)
gpio.output(13, True)
gpio.output(15, False)
time.sleep(2)
# trás
gpio.output(18, False)
gpio.output(22, True)
gpio.output(13, False)
gpio.output(15, True)
time.sleep(2)
# parar
gpio.output(18, False)
gpio.output(22, False)
gpio.output(13, False)
gpio.output(15, False)
time.sleep(2)
Thats? No!
We need test after.. open a Terminal and enter in directory of file (Use command cd). After use this command: sudo python NAMEOFFILE.py
Enjoy!
However, I will test more training to improve this script. Let's give the project progress. See you out there!

Welcome Saymon ! Ya .. you
Welcome Saymon !
Ya .. you have good parts (although as we mentioned raspi is a little weak for vision processing) still it will be fun to see how much we can get working..
It's certainly enough to create an autonomous & remote controlled bot with MRL.. this task will take many steps.. but a good journey does :)
Step #1 - although you can play with MRL on your computer.. the first step to create autonmous robot with raspi is to install MRL on raspi - follow these steps - http://myrobotlab.org/content/raspberry-pi-0 if you have questions ask us.
Hello!
I have a problem when i`ll make the Step #1
The version of myrobotlab is ok?
i`m using this tuto-> myrobotlab.org/content/raspberry-pi-0 in th step 4....
This is the command line error..
pi@raspberrypi ~ $ cd myrobotlab.1934.20140123.0626
please write java -version
please write java -version and tell us what it says
Hi Saymon,It is "Borked" -
Hi Saymon,
It is "Borked" - it's supposed to get more information from the raspi - like what instruction set the cpu is on and weather its a "soft-floating point" or "hard floating point" operating system...
instead it seems to have "blown up"
fix is coming momentarily....