To make better use of the InverseKinematics service, I startet defining the necessary parameters for the right arm, according to the Denavit-Hartenberg convention.
For this task, I used the 3d InMoov V1 SketchUp-Model https://www.thingiverse.com/thing:1995318.
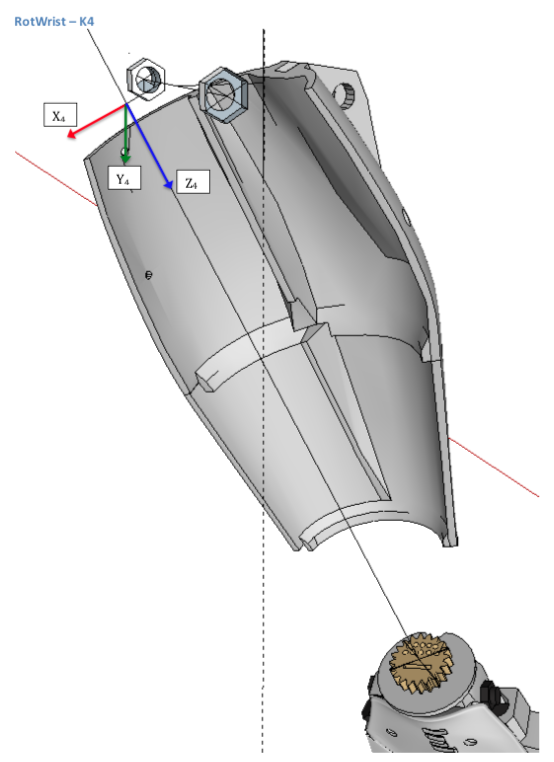
First, here is the definition of coordinate systems:
Omoplate & Shoulder
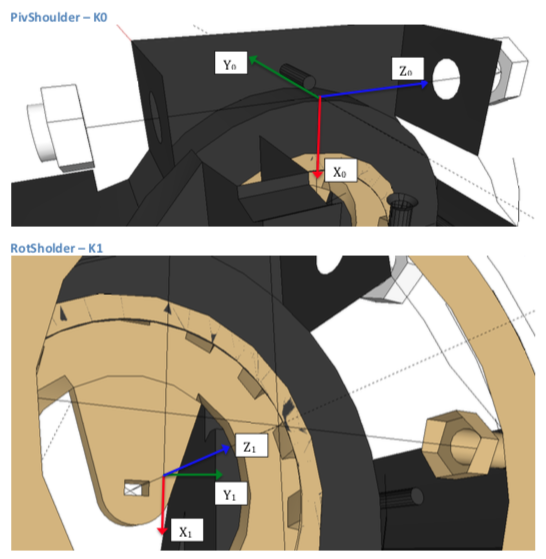
Rotate
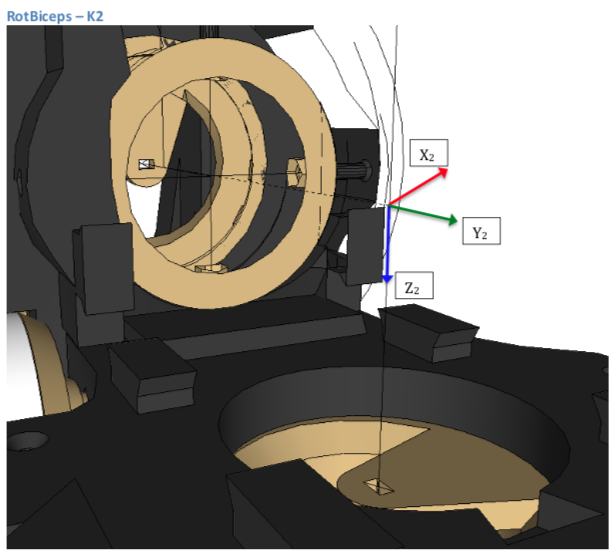
Bicep


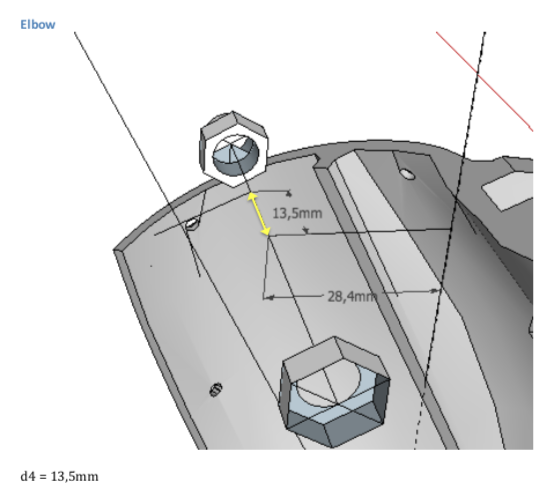
Second, here are the measurements of the parameters "r" and "d":
Omoplate

Shoulder & Rotate

Bicep

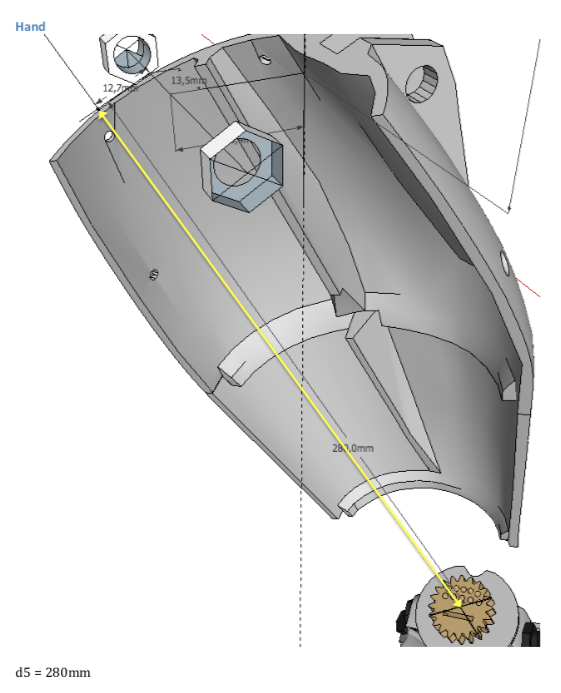
Third, that makes up for the following list of DH-parameters:
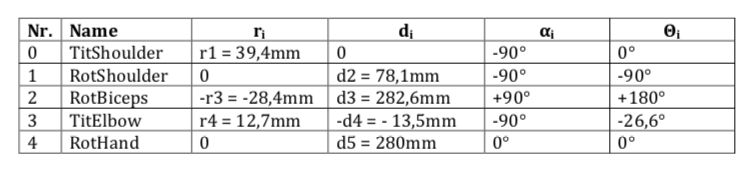
Original-Names: 0=Omoplate, 1=Shoulder, 2=Rotate, 3=Bicep
I would be very interessed, when somebody could get me feedback, if that is correct. I'm not a professional in robotics, so there might be an error.
In the meantime I will calculate the rotation matrixes.
Cheers,
--Andreas.
D-H Parameters! My favorite!
Awesome post! just fantastic. We have support for DH params in MyRobotLab. Here's a pointer to the current model that I use for the InMoov arm. I think it's pretty similar to your table of parameters.
If I'm not mistaken, these are the "modified dh params" ( I know there's 2 flavors of DH params.. )
I have often used (reasonaly succesfully, ) the program MRPT to simulate the params to get a sense if they look correct.
https://github.com/MyRobotLab/myrobotlab/blob/develop/src/main/java/org…
For quick reference here's what I'm using
https://github.com/MyRobotLab/myrobotlab/blob/develop/src/main/java/org…
The order of the parameter is "d" , "r", "alpha", "theta" seems like we came up with nearly the exact same parameters,
"theta" is the value that changes when you move a servo for each of the links.
We have the ability to create the homogenous transformation matrix for a chain of dhlinks so we can easily compute the forward kinematics.
We also have a pretty simple inverse kinematics solver that uses a pseudo jacobian approach. (It's been on the list to try a dual-quaternion approach. but I don't know if anyone has taken a shot at implementing that yet.)
D-H support in myrobotlab
Thank you very much for the provided links!! I didn't know, that there was support for (inverse) kinematics in myrobotlab already. I'm now looking into your code which looks brilliant! Great job! Is there a connetion between the service 'InverseKinematics' and your source or is that a bottom-up approach, which isn't visible from the GUI yet?
Regarding the D-H parameters: What looks strange to me is the difference between the angle orientation you posted and the ones I calculated. Probably I made mistakes there. Are your sure, that all the alphas are zero? Following your hint, I will install MRPT and try to get the robotic-arm app up and running to check on these parameters. Lets see the outcome...
Hi AndreasWelcome the fun
Hi Andreas
Welcome the fun world of the inverse kinematics.
I also make some trial at using inverse kinematics to have the inMoov position by itself using simple command like reach that target location or reach that object in front of the robot. You can found my tentative in the IntegratedMovement service, wich is base and expand from kwatter great work with the InverseKinematic3d who laid out the foundation.
The goal of the IntegratedMovement service are
and that just a few thing of what I think is possible to do with inverse kinematics
To answer you question, heres my own DH parameters that I use the the project. but the links are starting with the torso instead of the shoulder like you and kwatter did
ik.setNewDHRobotArm("leftArm"); ik.setDHLink("leftArm",mtorso,113,90,0,-90); //ik.setDHLink("rightArm",ttorso,0,90+65.6,346,0); ik.setDHLink("leftArm",ttorso,0,180,292,90); ik.setDHLink("leftArm", "rightS", 143, 180, 0, 90); ik.setDHLink("leftArm",omoplate,0,-5.6,45,-90); ik.setDHLink("leftArm",shoulder,77,-30+90,0,90); ik.setDHLink("leftArm",rotate,284,90,40,90); ik.setDHLink("leftArm",bicep,0,-7+24.4+90,300,0); ik.setDHLink("leftArm",wrist,0,-90,0,0); ik.setDHLinkType("wrist", DHLinkType.REVOLUTE_ALPHA); ik.setDHLink("leftArm","wristup",0,-5,110,0); ik.setDHLink("leftArm","wristdown",0,0,105,45); ik.setDHLink("leftArm","finger",5,-90,5,0); ik.startEngine("leftArm"); ik.setNewDHRobotArm("rightArm"); ik.setDHLink("rightArm",mtorso,113,90,0,-90); ik.setDHLink("rightArm",ttorso,0,180,292,90); //ik.setDHLink("leftArm",ttorso,0,180,297.5,90); ik.setDHLink("rightArm", "leftS", -143, 180, 0, -90); ik.setDHLink("rightArm",Romoplate,0,-5.6,45,90); ik.setDHLink("rightArm",Rshoulder,-77,-30+90,0,-90); ik.setDHLink("rightArm",Rrotate,-284,90,40,-90); ik.setDHLink("rightArm",Rbicep,0,-7+24.4+90,300,0); //////////// //#ik.setDHLink(wrist,00,-90,200,0) ik.setDHLink("rightArm",Rwrist,00,-90,0,0); ik.setDHLinkType("Rwrist", DHLinkType.REVOLUTE_ALPHA); ik.setDHLink("rightArm","Rwristup",0,5,110,0); ik.setDHLink("rightArm","Rwristdown",0,0,105,-45); ik.setDHLink("rightArm","Rfinger",5,90,5,0); ik.startEngine("rightArm"); ik.setNewDHRobotArm("kinect"); ik.setDHLink("kinect",mtorso,113,90,0,-90); ik.setDHLink("kinect",ttorso,0,90+90,110,-90); ik.setDHLink("kinect","camera",0,90,10,90);I sure want to see more about
I sure want to see more about all this.
With Nixie version this is going to be super cool.
I tried only once to use the kinematic for the left InMoov arm using Kwatters code, but it wasn't success due to Manticore being in a work in progress at the time.
I can't wait for the evolution.
(Quick tip: lets keep the names of parts as close as what I called them, to avoid future confusion)
Original names
Hi Gael,
hopefully I'm using the correct names by now. I made corrections in the text above the pictures.
Redoing all the pictures is lots of work...
DH table
hi
DH table
Hi calamity
would you please provide me with your D-H table , because the parameters you gave in your code are just angles, i need the links distance
reference point for whole robot
nice to see work done on this subject.
I once tried to solve the puzzle of "look at right hand" and "look at left hand" using dh parameters and the read out of all the joints involved.
I used midStom as the reference point as it is in my opinion the best place to define all the joints and "bones" of InMoov and should also work for the legs some people try to add.
You can find my code here
pyrobotlab/home/juerg/lookathand.py
I am currently working on finding aruco tags in the room, approach them with my cart InMoov sits on and have Marvin (my Inmoov) point at the marker with its index finger. I also intend to navigate the cart around obstacles between the cart and the tab. I use the kinect to create a floor map of the room and have in addition distance sensors mounted on the cart to avoid collisions.
dh-params
Hi Andreas
I have been working on a standalone python task (python 3.6) to show a stick figure of InMoov. It uses 3 basic link chains, left arm, right arm and head and these start at the center of my cart Inmoov sits on. I have also defined chains for the fingers that are attached to the end effector of the wrist.
To draw a finger it uses the the end result of the left/right arm calculation and continues on with the finger definitions.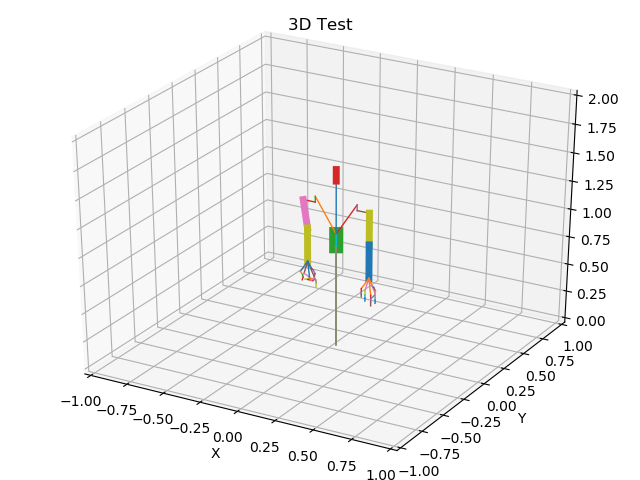
My code is here:
https://github.com/juergmaier/ik
To verify/work on the dh-parameters I was using RobotAnalyzer (free). For some links I had to add "dummy" links (servo None) to get there. Maybe that can be improved but I was happy to make it that far.
Best explanation of the of the dh-params for me was this short video:
https://www.youtube.com/watch?v=nuB_7BkYNMk
The video also shows you how the "links" get their dimensions.
The video has a difficult to follow voice explanation but a clear graph.
I experienced it rather challenging bending my mind through all the links :-)
Maybe it is of use for you. I am working now to make it a part of my servo control for InMoov, using the actual joint settings of the robot.
I have a intel realsense D415 mounted on the head of InMoov and looking down it "sees" its own limbs. As these move with the robot they should not be considered as obstacles when checking for a free path. My intention is therefore to "subtract" the robot parts from the D415 point cloud. Still a task ahead.