Back in February I back a Kickstarter campaign for what was described as a Single Board Computer with the heart of a Mac Book For the level I supported this set me back around the AU$500. The campaign was successful, however production had a number of delays, the result was Thursday 9th of Nov, I received a package containing my brand new Latte Panda Alpha. Interestingly enough the site that was supposed to show tracking info when it was shipped still did not list that it had been shipped.
The Latte Panda Alpha is a single board computer around 50-60% larger than a Raspberry Pi 3 physically but packing a lot more memory and power.
Out of the box the Alpha 864 has 8Gbytes of ram and 64GB of eMMC storage and a licenced copy of Windows 10 Pro installed.
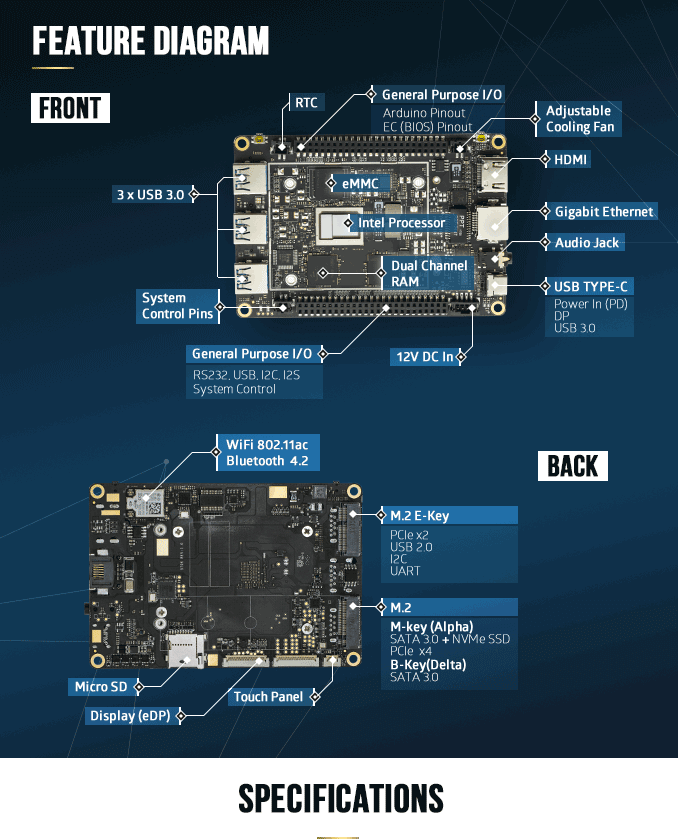
Like the Raspi3 the Alpha has Wi-Fi, Bluetooth and HDMI however the built on Ethernet port is Gigabit instead of 10/100, it has 3 USB3 ports and one USB-C port.
The supplied power adapter is a USB-C device and powers the Alpha via the USB-C port.
Like the Raspi 3 the Alpha also has ports for a n LCD with touch screen (not quite yet available) but where is differs is you can also use a USB-C adapter to drive VGA, DP and DVI. Another difference is you can drive up to 3 displays at the same time.
During my time of playing with the SBC, I didn't have a decent monitor to connect to it, but for those interested the max resolution on the HDMI is 1920 x 1080 @ 60Hz
Like the Raspi3 the video is shared with the CPU, but unlike the Raspi3 there is a whole lot more ram available with 8GB.
The CPU is an Intel Core m3-7Y30 running at 1.61GHz. This is a dual core quad thread processor.
Another major difference between the Raspi3 and the Alpha, are all the extra ports. On the underside is and M.2 Key-M port as well as an M.2 Key-E port, the Micro-SD card slot the ports for the edp display and touch screen interface as well as the two antenna connections for the Wi-Fi and Bluetooth, there is also one other port I have not yet identified.
On the top side There is the HDMI, Gigabit Ethernet, what looks like an 3.5mm audio socket (havent tested it yet and not listed on the diagrams :-) ) the USB-C port A connection point for 12Vdc (This by all account has a reasonable voltage input range making it suitable for powering from a car battery) There are the 3 USB3 ports a power button (This does not power up when power is first connected, you have to push the power button to turn it on) A connector for an external power switch and then a heap of connections for hacking :-)
One of the other major differences is the Arduino Leonardo co-processor. This powers up with the connection of power and run whatever program you have installed, For a while there I had Blink :-)
One side of the Alpha has a double row of female headers for the standard Arduino connection, if not the standard layout, on the other side is the connection for USB, RS232, I2C, I2S.
There is also a fan installed on top of the main processor that is connected to a PWM output to control it.
By default the fan turns on when the processor hits 70 degree C and turns off again at 60 degree C
On power up for the first time, the blink sketch was installed in the Leonardo so it red LED near the blue power light started it blinking, there was also a pulse from the blue power light. Pressing and holding the power button until the blue light turns on and stays on starts the main processor.
First thing I did was download the latest version of MyRobotLab (MRL) to give it a run.
Here was my first hurdle, Java was not installed.. Doh.
Neither was chrome, so first I installed Chrome then installed Java 1.8.
From the CMD prompt I launched MRL with the -install flag and let it go.
Past experience with the Raspi is go find something to do while it installs, not so with the Alpha, this was like installing on my I7 Quad Core laptop. (Cool)
Ok, after installation, the first this I had to do is try out YOLO, so I found a cheap web cam (stole it from my 3D Printer) and started the OpenCV service. Touching nothing else, I hit capture and was presented with an image of my face. That was scary. :-)
Next scroll down the list of filter, and there it was YOLO, so added that and was presented with a box around my image with an 80% chance it was a person... :-)
Ok, so with that success under my belt, I hunted around and found y PS3eye camera. This camera has Microphones built in.
Unfortunately, this camera did not work.
I have used this camera with MRL before on both my win7 laptop and on a Raspi3 with MRL, so its more than likely a driver issue in Win10 on the Alpha.
Next up, install MRLcomm on the Leonardo.
The Arduino IDE comes pre-installed on the Alpha so it was not hard to open the MRLcomm sketch, select the Leonardo processor and the USB com port, however this was where trouble stopped me dead in my tracks.
Arduino: 1.8.5 (Windows 10), Board: "Arduino Leonardo"
Build options changed, rebuilding all
C:\MRL\resource\Arduino\MrlComm\MrlComm.ino: In function 'void setup()':
MrlComm:89: error: no matching function for call to 'MrlComm::begin(Serial_&)'
mrlComm.begin(Serial);
^
C:\MRL\resource\Arduino\MrlComm\MrlComm.ino:89:22: note: candidate is:
In file included from C:\MRL\resource\Arduino\MrlComm\MrlComm.ino:53:0:
sketch\MrlComm.h:170:10: note: void MrlComm::begin(HardwareSerial&)
void begin(HardwareSerial& serial);
^
sketch\MrlComm.h:170:10: note: no known conversion for argument 1 from 'Serial_' to 'HardwareSerial&'
exit status 1
no matching function for call to 'MrlComm::begin(Serial_&)'
This report would have more information with
"Show verbose output during compilation"
option enabled in File -> Preferences.
Just to be sure, I was able to compile this for the Nano, Mega 2560 and the UNO.
I was also able to install a number of other sketches to the Leonardo. Doh.
Looking at the web site for the Alpha, it has a section on recommended tools, in the list was the Arduino IDE (Already installed) with a link to the Arduino web site, but also a number of other programming IDE's as well, such as Python, Microsoft Visual Studio and Eclipse.
Well I had to try, so I followed the link and downloaded the IDE and installed it.
Next back over the MRL and follow the instruction for setting up the Eclipse MRL repos.
Success, it installed no problems at all, did take a while to download all the Repos, but MRL itself was reasonably quick.
Guess I need to learn java now :-)

Lattepanda
I'm trying to use MRL on a Lattepanda V1 with Windows 10 installed. Downloaded myrobotlab 1.0.2693.16, run the "Windows Batch File"and in runtime selected install all. No problem at this point and I thought I was home and dry. I closed MRL, connected my Inmoov to the Lattepanda and run Servo Calibration in Tools. Once MRL was loaded I selected the port and Arduino and hit connect, MRL closed down on me. Same isse when I hit "Start Inmoov" and try to connect to the Arduino. Tried this several times, same issue every time.
I don't seem to have the same issue when I try the above on my PC, also running Windows 10 which points the finger at my Lattepanda V1 (well also on me obviously :) .
Please comment if you know how to fix this as it drives me insane.