.png)
Makes sense I could not see the head - The Lights Were Switched Off ! .. After switching on the lights - I think the InMoovHead.blend has a variety of long, skinny nearly invisible artifacts - so as the model was imported - the object is very large, (most of it transparent) - and the head is far far away ...
I'm not working with hindges or joints yet - when the servo slider bar moves - the whole object rotates on a center axis. I'm interested to see Mats' progress.
.png)
InMoov head not so happy ... trying this with embedded JMonkeyEngine
Got JMonkey's asset manager Worky.. Don't know all the details, but this is a "model" vs the previous cube was just "raw geometry". Pretty sure I don't yet know how to use the asset manager to load from a file, currently I'm pretty sure its loading from a jar called "assets.jar" - which might be a nice way to distribute from the repo (e.g. InMoov models with inmoov-asstest.jar) - just so when you want bare bones mrl install you can have it.. time to research/test some more ! Next step is to load the InMoov head into the new JMonkey service ..
I thought I'd start a small post to describe what I've found out so far regarding JMonkey.
Summary :
JMonkey is a 3D game engine written completely in Java (yay!)
Its built on top of LWJGL - https://www.lwjgl.org/
I assume JMonkey adds a lot to LWJGL, but I don't know the details
Step 1 - download install the JMonkey SDK - it comes with its own editor
I struggled looking for source code examples which compiled. The first set I found is here :
Step 2 - look for examples
I started looking for samples (didn't know it contained a large set of them already)
And found this BookSamples code - which compiled and ran without errors. Had I know this I'd skip directly to Step 3.
Step 3 - run/debug examples
Turns out JMonkey SDK comes with a complete set of examples which are correctly paired with the version your running. Same concept we hope to do with InMoov & other service scripts .
Start by - new project ->
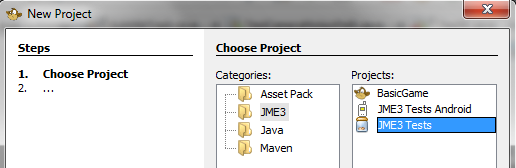
Expand the folders
Pick a File (not all can run as samples - the ones which have a "main" function can)
Right click -> debug
.png)
Effect ! - now you can go to the source and tweak things .. to start cause --and--> effect
Rinse and repeat :)
.png)
This is the TestPhysicsHingeJoint - which is the one I'm currently looking at .. possibly relating to Servo joints of the future :)
Resource Links :
- Good place to start - Game Tutorial
- Docs Site (out of sync - go figure :)
- Home
- Forum
- LWJGL
- Video Tutorial SDK
- Interesting JMonkeyEngine was forked - fork died - (sort of)
2017-01-15 - Making great progress creating Simulator and VirtualObject interfaces .. I suspect very soon I'll have Servo control of a JME3 Servo graphical object with VirtualArduino in-between. Excited about how fast things are falling into place.
.png)
Borg'd .. Got embedded
Borg'd ..
Got embedded JMonkey running from inside MRL ..
Not too difficult .. need to weed some jars out..
One problem I ran into was jinput, it comes with its own version - I tried removing some of the conflicting versions, but there still is a crazy input going on .. Finally I found a "jmonkey app settings" which turns off input. That stablized the image - previously it would scroll vertically and flicker ...
JMonkey and Blender
Hi
I was able to import VirtualInMoov to JMonkey:
1. Download VirtualInMoov fron here:
https://github.com/MyRobotLab/pyrobotlab/blob/master/home/GroG/VirtualI…
2. Start JMonkey and create a new JME3 Basic game. Call it whatever you want.
3. Open the Project Assets => Models folder
4. Copy / Paste the VirtualInMoov model to the Models folder
5. Rightclick on VirtualInMoov.blend and select 'Convert to j3o Binary
6.Rightclick on the Scenes folder. Select New => Other => Scene => Empty jME3 scene
7. Go back to the Models folder and rightclick on VirtualInMoov.j3o => Add in Scene composer
The parts show up, but they need to be realigned. Not sure if it's better to do it in JMonkey or Blender.
Thanks Mats ! I think I used
Thanks Mats !
I think I used JME3's "import" from .blend vs Blender's export to .j3o
I imagine some things differ depending on what route you use .. Really glad to see you experimenting !
I got JMonkey running in MRL, but will have some dependencies to clean up before pushing ...
WOOHOO !
Blender bones
Found this Guide on how to create Blender Assets and how the Blender models must be organized to be usable on Jme3.
https://jmonkeyengine.github.io/wiki/jme3/external/blender.html
I also found that JMonkey has a Scene explorer makes it easy to see the content of an Asset like a Blender model.
The two screenshots shows the structure of VirtualInMoov and a different model that I made as a tst to see if Bones were exported. And they are. So now it's a question about how to get the bones to a correct structure, As you can see in both cases the different objects are just piled up and don't have the structure that they need.
Perhaps it's better to start with a cleaned up version of Gaels's scanned InMoov. I cleaned it up in Blender and tried to import it to jme3. Still missing the bones, but if it works, we have a model that can be used to simulate the walking algorithms.
This is great progress
This is great progress Mats,
I'd be interested in your model (if at first just to see how it looks with the MRL embedded JME) and that I can rotate the whole thing (as a single object) through VirtualArduino & VirtualServo
I'll put a shout out to the best Bone Doctor I know too ...
Virtual InMoov with legs but no bones
Thanks Gareth for explainging about bones. After reading more about JMonkey I now understand that a model exported from Blender needs to be a single mesh. So I will try method no 2, even if it will look a bit strange for a robot to move like a organic creature. My test is primarily to understand the requirements on how the Blender model needs to be built to be possible to use with JMonkey.
The current model can be downloaded from here:
https://github.com/MyRobotLab/pyrobotlab/blob/master/home/Mats/VirtualI…
A video describing the workflow, so far.
Update: The model has now been rigged with several bones in the upper body. The legs don't have any bones yet. The model with bones has now replaced the model without bones and can be downloaded from here: https://github.com/MyRobotLab/pyrobotlab/blob/master/home/Mats/VirtualI…
I found this introduction to JMonkey very informative.
https://www.youtube.com/watch?v=0DexuIQ6JqU&t=188s
Dr.Bones
Firstly its great to see Jmonkey (only just DLed so yet to fully check out).
Just to clarify a few points with regards to Blender bones methods.
There are kinda two main methods to articulate bodies. Both use bones however they are used differently depending on the visual effect you are after.
InMoov model
Hi Gareth
Do you have a better model of InMoov ( with bones / legs ) that we could test in JMonkey ?
I tested with this model, but it doesn't have any bones. Perhaps it can be used anyway, but it's also missing the legs.
https://github.com/MyRobotLab/pyrobotlab/blob/master/home/GroG/VirtualI…
And I also tested with this model that is a 3D scanned model No bones but legs. Low detail level and a single mesh.
http://inmoov.fr/inmoov-stl-parts-viewer/inmoov-stl-3d/?bodyparts=InMoo…
Preferably we should have a model with all movable parts, but joined to form the different movable parts.
/Mats
VirtualInMoov.blend
The version here https://github.com/MyRobotLab/pyrobotlab/blob/master/home/GroG/VirtualInMoov.blend
is the complete torso version, in the Blender environment all the bones are connected to the objects, however porting it to other systems will probably break the bone-object associations.
The objects are essentially attached to the armature (bone) framework, then moving bones moves the associated object.... for interactive work (ie. motion capture) bones are the way to go.
( the first version of vinmoov used parent-child relationships between objects (no bones or armature), however this leads to other issues which I would not like to relive again).
I do have other versions however they all have the VirtualInMoov.blend
basic as the background.
InMoov 3D model
Thanks Gareth.
That's the model I started with where all the parts loads at the origin (0,0,0).
I have not been able to manipulate the bones in any model using jme3. It seems like you can create animations in Blener and run them in jme3, but accessing the bones to manipulate them directly seems more difficult. Seems strange. I will try some more examples to see if I can find a working method.
Great Video's Mats
That explained much. Excellent video, previously I was not "right click adding it to the scene" - and of course turning on the light helps seeing things :) I learned that in the embedded JME version ..
I'm wondering if we can get Gael's & Gareth's permission to use the model which Gareth worked on when we were trying to get Blender service & VirtualInMoov working previously.
If so it would be helpful if you had the files.
At the moment I'll download the scanned model you created and we can experiment with that.
Nice Progress !
IntegrateMovement & jMonkey
I have play a bit with jMonkey in MRLand it's really awesome
I have try to make a visualization of the data use by the collision detection algorythm use in Integrated movement. In the picture below, blue part are are 3d shape of the InMoov body part (torso and left arm) compute from the DH links. In red, its 3d shapes compute with kinect depth map data.
kinect depth image of two boxes with a bottle on top
Not perfect, but i'm really excited that I have been able to have a 3d representation of the dh link and kinect data and with all the posibility it open.
Next step is to have the visualization in real time as the inMoov part and kinect data evolve, then I will try to use mesh to show in jMonkey
Exporting Blender models to JMonkey using Ogre plugin
After a bit of searching around, the recommended way of getting models into JMonkey is to install the io_export_ogreDotScene.py script into Blenders user preferences.
Once installed it can be activated by a button, and the model can be exported using the Ogre export option.
The export gives more options :-
Not sure why Inmoov is all red (dont know much about JMonkey) ....yet
As you can see the objects are correctly placed and the armature has also been imported.
InMoov Bone Parts
maybe the github repository of peter heim has the movable items as needed for JMonkey. It is used for ROS by him.
https://github.com/inmoov-ros/inmoov_ros/tree/master/robbie_description